
Learning is a journey for both students and teachers. Edsby’s Destinations allows for both students and teachers to visually see the journey and the destination of where their learning will take them. Destinations allow for students to have autonomy in their learning by permitting them to self-assess their learning and reflect. Teachers can also create a shared sense of learning and understanding with their students by co-creating the learning destinations with their students.
Accessing Destinations
To access Destinations, first navigate to a class, then click on the Destinations tab in the top right of the class. The Destinations will already be pre-loaded from the curriculum that has been loaded into the class. Destinations can also be accessed from the shortcut in the classes panel.

Modifying Destinations
When teachers first open Destinations, they will see the dashboard which includes:
Destination Cards
At the top of the table are tiles representing specific learning goals or expectations under subject strands. Once you have put the expectations into student-friendly language, it will appear as you have written it.
Student List
On the left-hand side of the table, you will the list of your student roster. For each student, you will see a corresponding cell for each learning destination. Once a student has begun to work on a destination, a numerical value or progress bar will appear in the cell. What appears in the cell of the student is dependent on what is selected in the ‘Show’ option: either Progress or Count.
Progress
At the bottom of the page you will see a row titled ‘Total Progress’. This is a tracker that shows the progress for students for each destination. For example, in the image above, we can see that currently, 0 out of 19 students have attained the learning destination so far. However, as students continue to complete their learning destinations, the number of students for attainment will change.

To edit a Destination and put it into student-friendly language, simply click on the Learning Destination and click the text “Write a Learning Destination in a student-friendly language”. Input the student-friendly Learning Destination in this space. Once teachers have created their Learning Destination, they can proceed to creating Success Criteria. Success Criteria helps students to be able to track their progress as they work on each Destination. Typically, the Success Criteria is best written as “I Can” statements for the students. Teachers can add as many Success Criteria as they see fit. To add an additional Success Criteria, click the “Include Success Criteria to help students track their progress” text. Once the Learning Destination and Success Criteria have been written, simply click away or hit ‘Enter’ and the edits will be saved. Both Destinations and Success Criteria can be modified by the teacher if needed.
Below the Success Criteria, you will find the Standards associated with the Learning Destination. These Standards are automatically loaded and cannot be changed by teachers.
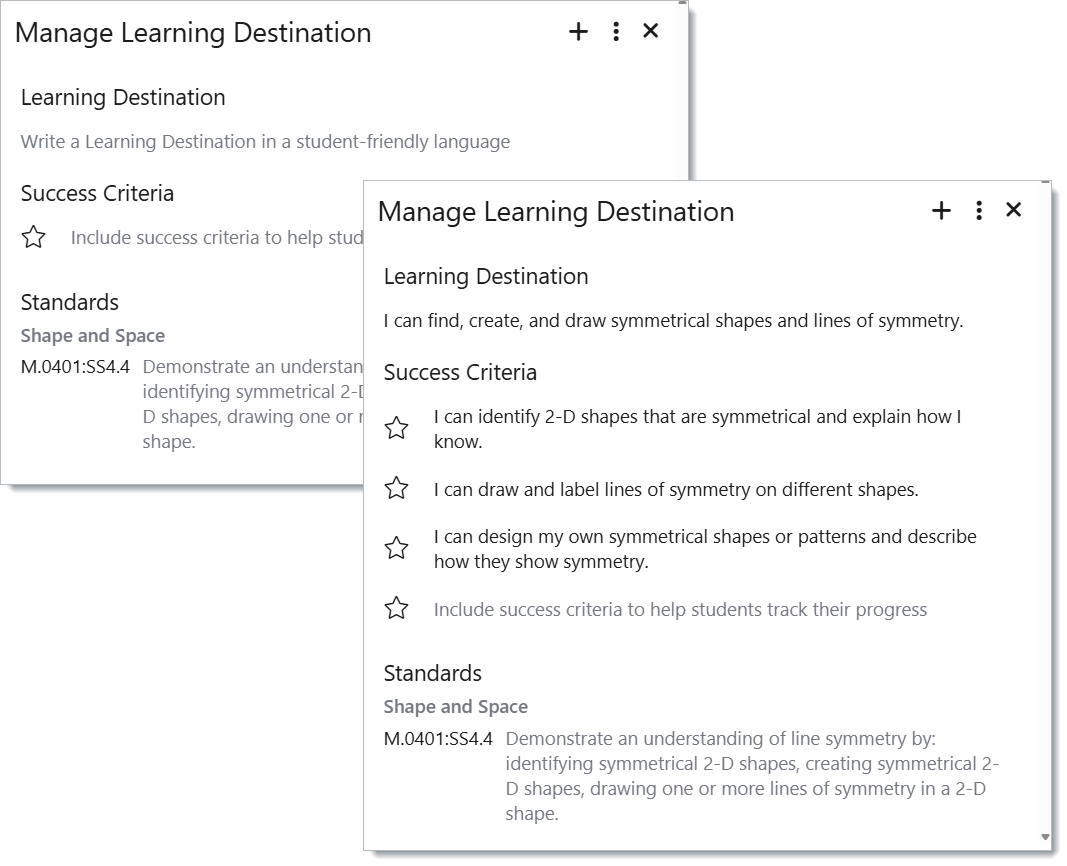
If text is not inputted for the Learning Destination, the Strand/Outcome will show in italics as it appears in the curriculum. The Destination card will initially appear as the Strand name and then the Standard text in italics.
Hiding Learning Destinations
To hide a Destination, click on it and click the 3 dots, select the ‘Hide’ button. Once a destination is hidden, teachers will see the eye icon with a line through it, indicating that the destination is hidden from students. Destinations can also be hidden by hovering over the right-hand corner of the Destination and clicking the eye icon. To unhide it, click on the eye icon again.

Adding Learning Destinations From Other Subjects
Teachers can add destinations from other courses by scrolling to the very end of Destinations and clicking ‘+ Create a Destination’.
When creating a new destination, teachers will be prompted to tie the Destination to a curricular expectation/outcome from another course. The Learning Destination can then be created in student-friendly language, and teachers can add their Success Criteria.

*Note: When creating a new learning destination, you cannot pick a standard that is already being used in an existing destination.
Re-ordering Learning Destinations
To re-order or re-organize Learning Destinations, simply click and drag the Destination card to the desired location. It may be a good idea to organize destination cards in chronological order so that students know what is upcoming.

Copying/Pasting Destinations
To copy a Learning Destination, open the card of the destination you wish to copy and click the copy icon which can be found next to the hide icon.

When a Learning Destination is pasted in groups and messages, the Learning Destination is displayed as a thumbnail. Clicking on it will open a read-only details view of the destination in a lightbox.
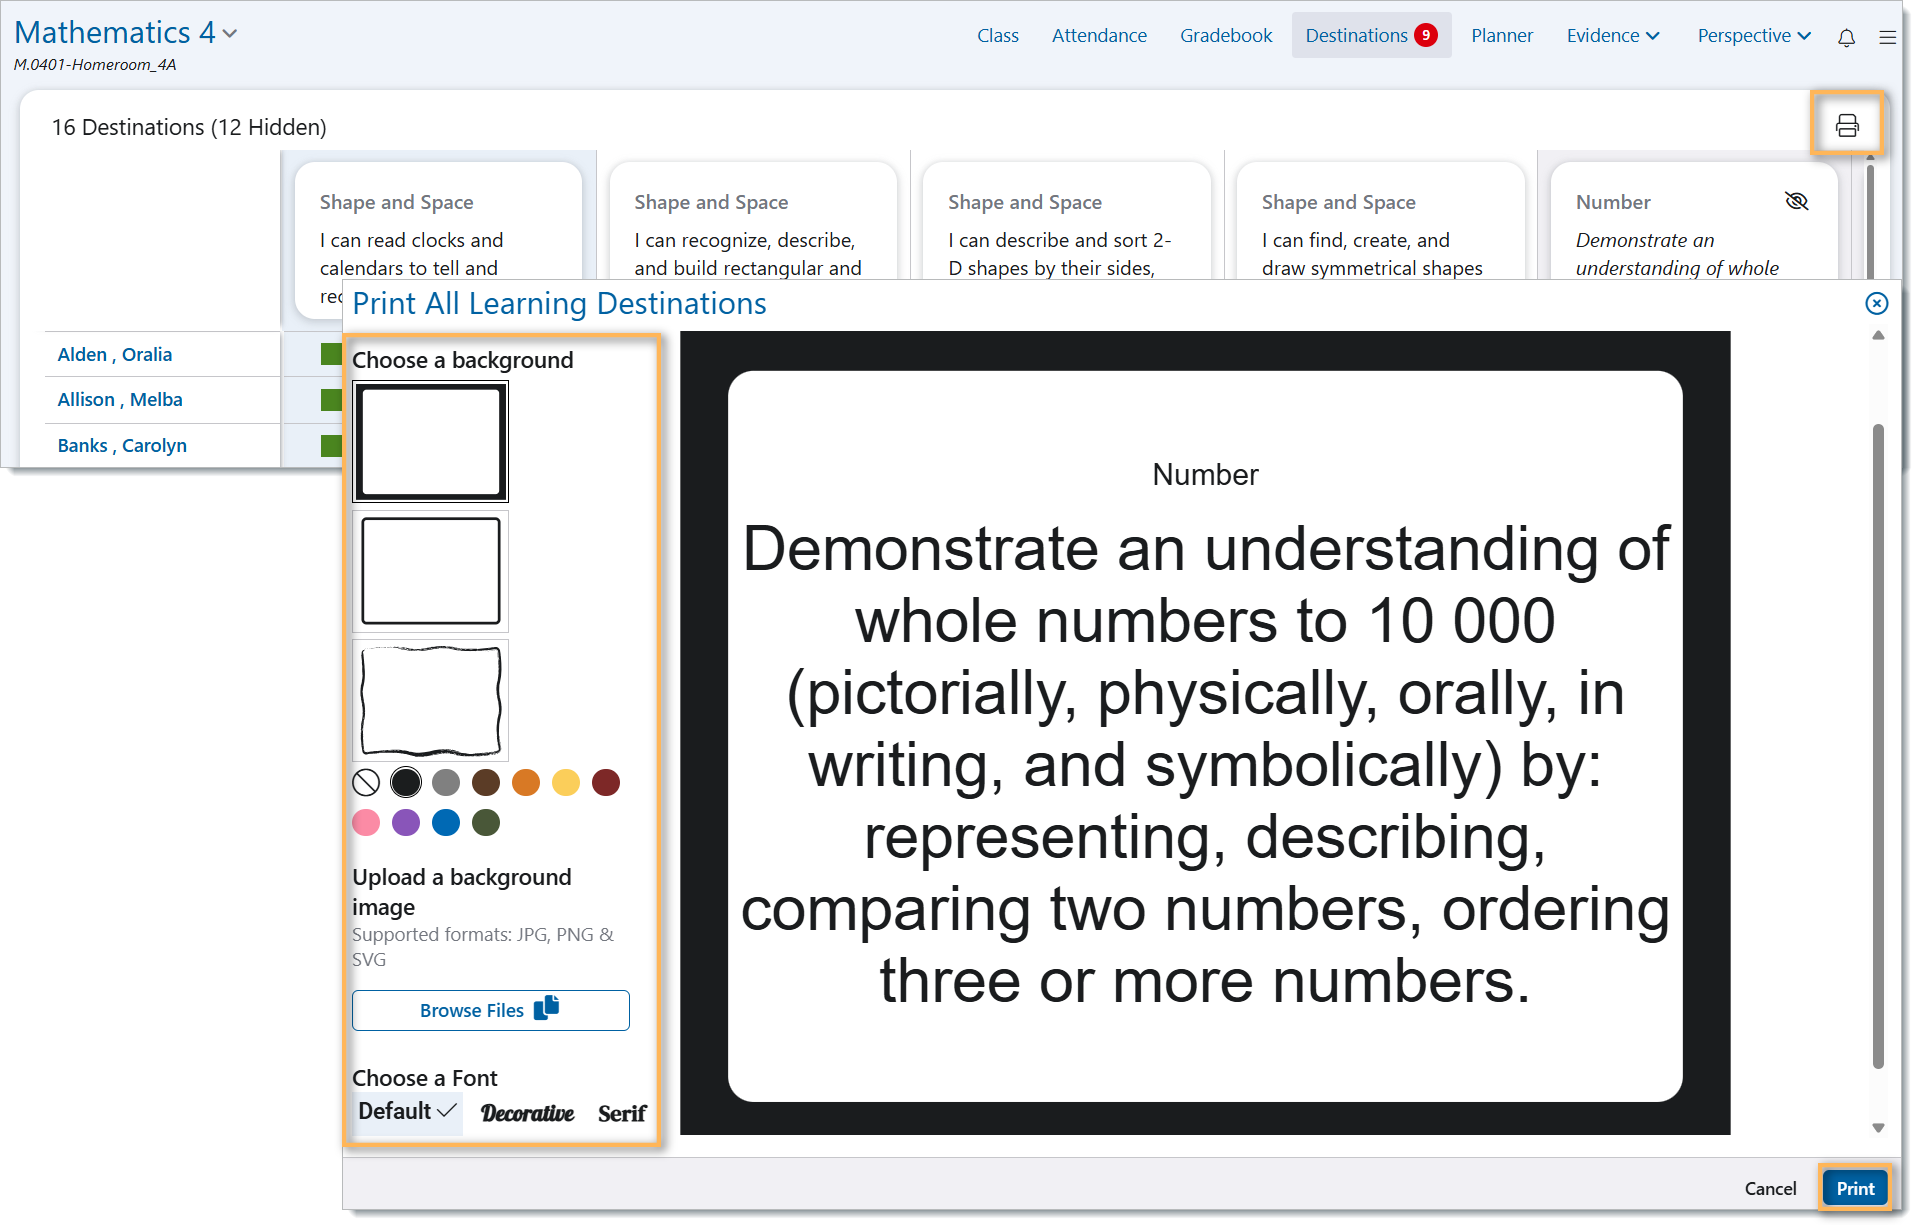
Printing Destinations
Teachers can also print their Destinations by clicking the printer button. Then, teachers can choose a background and font. Images can be uploaded as a background. Then click print.
Creating Activities and Assessments in a Destination
To create an activity, click the ‘+’ button that can be found when opening an individual destination card. Teachers will then be able to select one of the 2 options: New Activity or New Assessment. The activities and assessments created in the destination card will automatically be tagged with the corresponding standards. Once an activity has been created, it can be opened in the All Evidence feed.

Teachers can create an Assessment for students that is tied to a specific destination by clicking the ‘+’ button and then selecting ‘New Assessment’. Since this assessment is being created in the destination card, the assessment will also be automatically tied to the same curricular standards. Once the assessment is created, it can be viewed in the Gradebook as well.
When marking the assessment, teachers are able to share feedback with the students, and it will be shared in the feed of the destination.

Any graded activity or assessment created in Gradebook or Evidence will appear in the student’s Destination feed if it is linked to curricular standards.
Mobile View of Learning Destinations
To access Learning Destinations on mobile, teachers will follow the same steps previously mentioned.
To edit a Destination or the Success Criteria, tap on a Destination, tap on the arrows to scroll to other Destinations. Teachers can edit both the Destination and Success Criteria simultaneously. Tap on the three dots to access the ‘Hide’, ‘Copy’, ‘New Activity’, ‘New Assessment’, and ‘Print’ options.
Assessing a Student’s Learning Destination
When clicking on a cell beside the student’s name, the student card is opened. Teachers can do the following:
- Write a Note
- Capture Evidence
- Assess Success Criteria
- Respond to student questions
- View evidence that relates to the Destination
- View shared assessments that related to the Destination
Write a Note
When writing a note for a student, teachers can write information about how the student has been progressing. Notes that are written by the teacher can also be viewed by the student. Files can also be attached with a note. This space can be used to communicate with students by providing comments on their work or by asking clarifying questions to the student.

To share a note with the student, click Share, and the note will be shared with the student. Once a note has been shared, teachers have the option to edit and delete the note. Students can interact with the note by liking or responding to it.
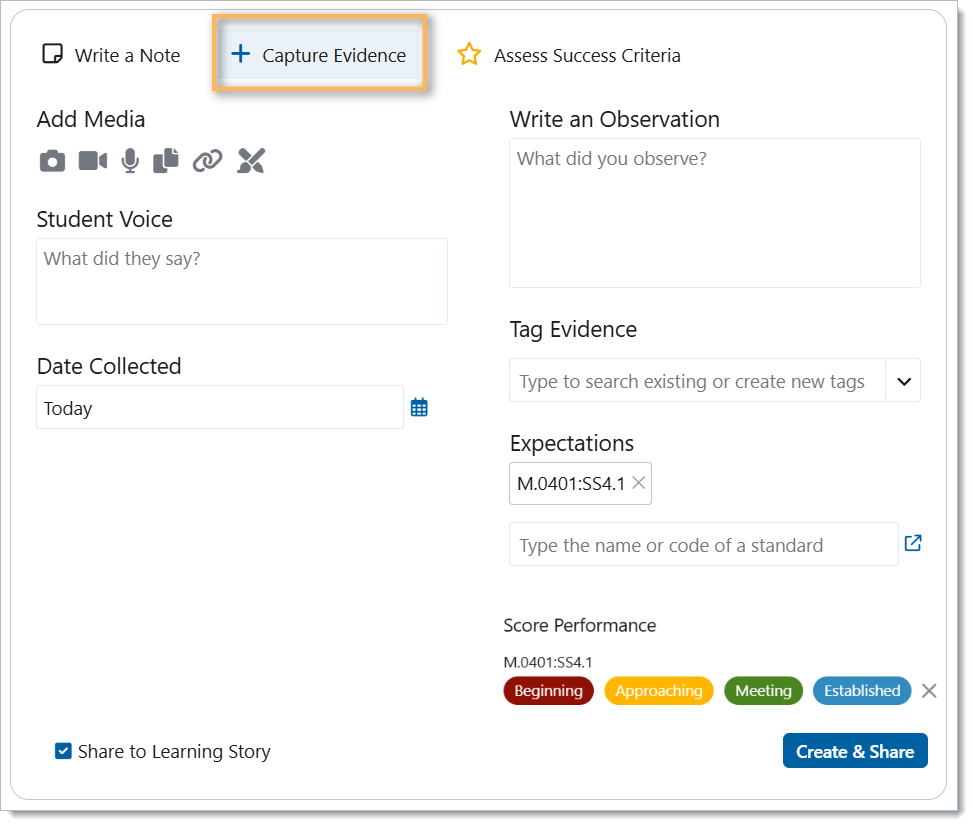
Capture Evidence
Clicking on ‘Capture Evidence’ allows you to submit Evidence on behalf of the student. Clicking this button will bring up the Evidence form. Fill out the form to submit Evidence for the student. The Evidence captured here will still appear in the student’s Learning Story. The Evidence must still be shared in order for parents to see the Evidence. To share the student’s Evidence to their Learning Story, click the ‘Share to Learning Story’ button that can be found at the bottom of the Evidence form.
The expectations/standards part of the form will be pre-selected based on the standard that is in the learning destination. Evidence created here can only be created for the selected student and the relevant class.
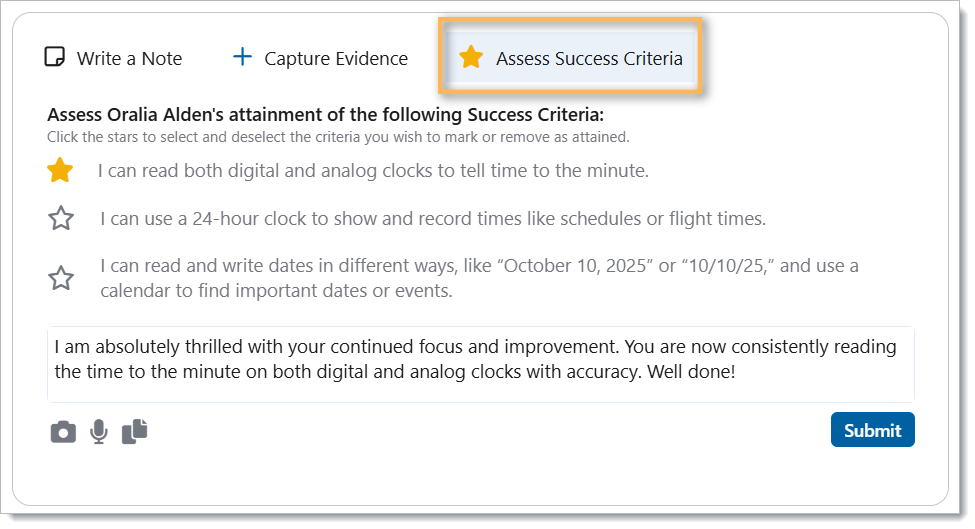
Assess Success Criteria
Once success criteria have been created for each destination, teachers have the ability to assess their students on each success criteria that they have created for them. To do this, click on the ‘Assess Success Critieria’ button. The Success Criteria are listed with a star beside each one. To mark a success criteria as attained, click on the star beside the success criteria. Click on the star again to change the success criteria to incomplete. When marking a success criteria as attained, teachers have the option to include a comment for the student. Once the comment is shared, students can like or reply back.
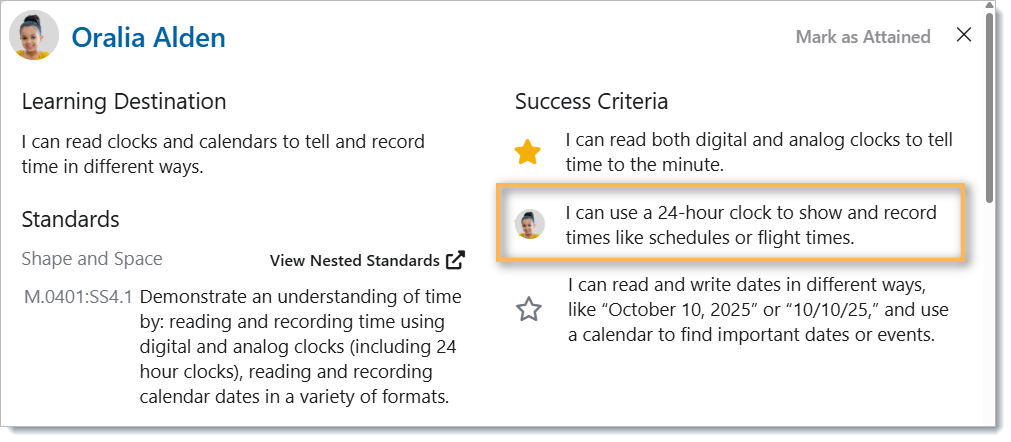
When students claim that they have completed the success criteria, the student’s profile picture will appear where the stars typically appear, as shown below. In this example, we can see that the student has claimed that they have achieved the success criteria that says “I can use a 24-hour clock to show and record times like schedules or flight times”.
Success criteria marked as Completed
Success criteria that has been previously marked as “Complete” appears pre-selected with a time stamp of when it was first marked complete. When editing a destination, teachers can click to remove the completed status of a success criteria. If the student had previously claimed that criteria as complete, the status will change from “Completed” to “Claimed”. If the student placed no previous claim on that criteria, it will change from “Completed” to showing as not completed (the star with no colour). Criteria that has been claimed by the student will show a time stamp of when it was first claimed.
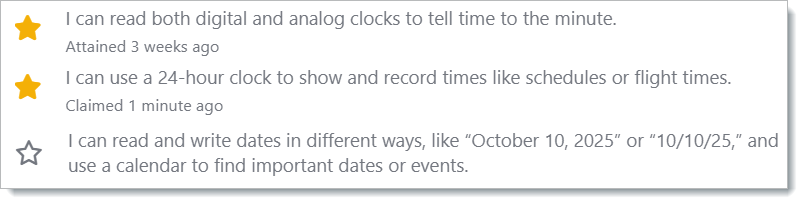
Removing a success criteria’s ‘complete’ status and re-applying it at a different date will change the attainment date to the most recent one. Teachers also have the ability to remove previously set attainments on any criteria.
Learning Destination as Attained
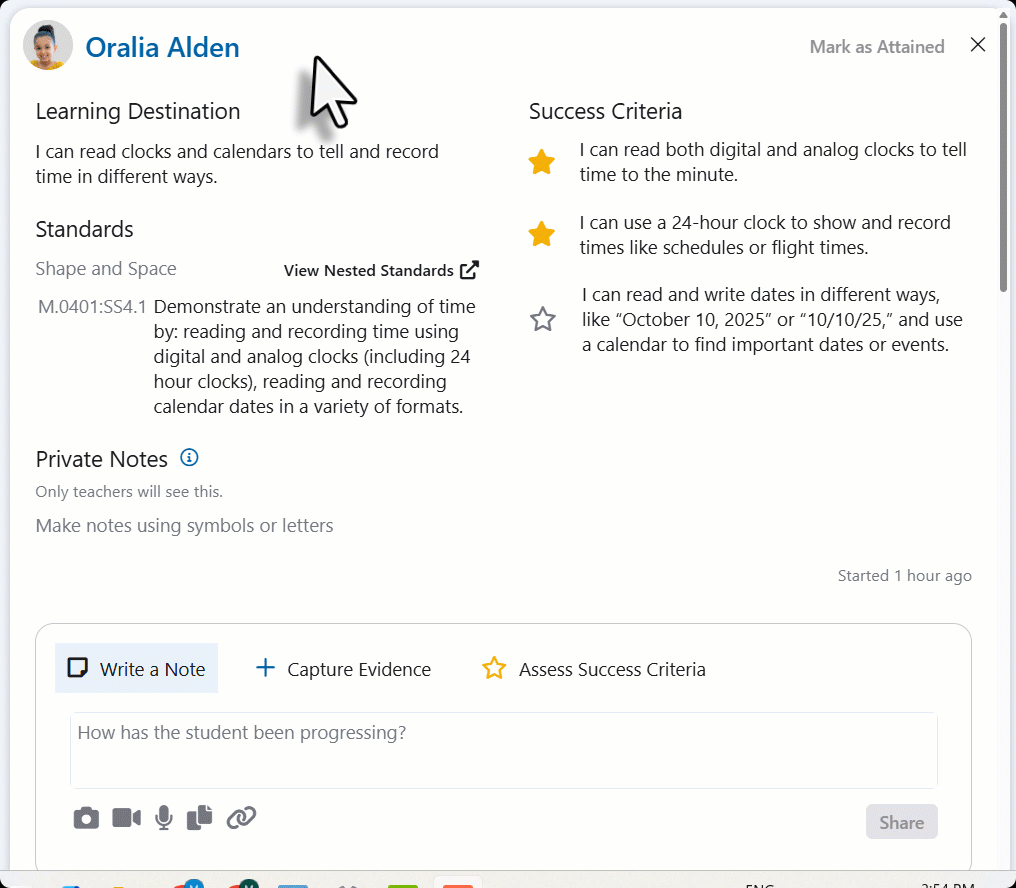
To mark a Learning Destination as Attained, click the ‘Mark as Attained’ button that can be found on the right-hand side of the Destination card. Once a destination has been marked as attained, the success criteria will be locked. To unlock the success criteria, remove the attainment.
When clicking the ‘Mark as Attained’ button for a specific destination, teachers will need to select the level that the student has achieved. That level of attainment selected will only be applicable to the specific learning destination currently being assessed. Destinations can only be marked as attained from the actual destination. The options to select from when marking a student’s destination as attained are typically set by your school’s district. When marking a destination as attained, teachers also have the option to add a comment to support their decision; however, this is optional.
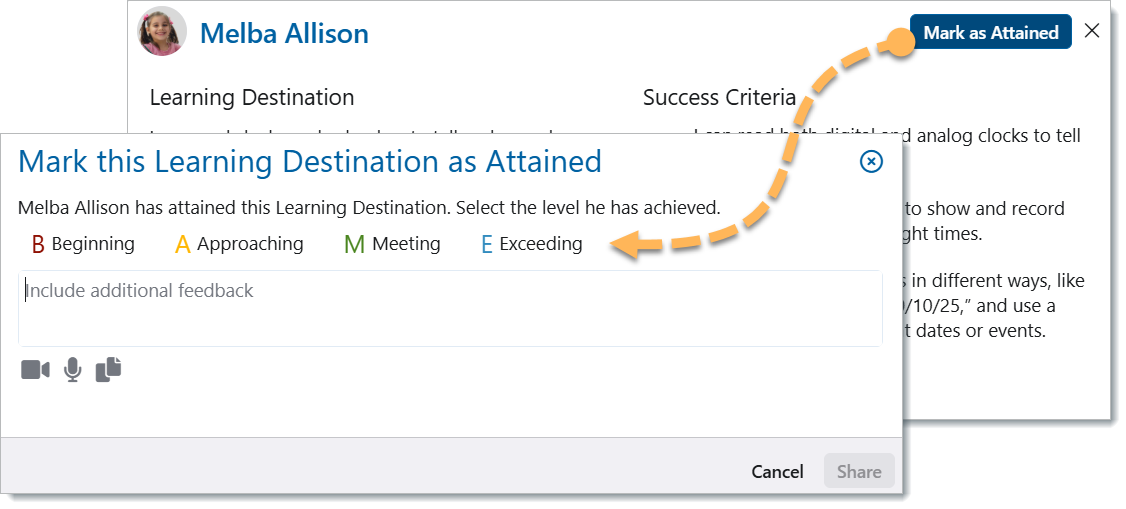
Once the destination is attained, a time stamp will appear at the bottom of the destination card, beside the time stamp of when the student started working on the destination. The success criteria become locked once the student has attained the destination. To unlock the success criteria, teachers will need to remove the attainment. This can be done by clicking the attainment.
When teachers have marked a Destination as attained for a student, this attainment will appear in the student’s Panorama. Anyone who has access to a student’s Panorama will be able to see the class, curriculum strand/outcome, and the attainment level for each Destination.

Providing and Receiving Student Feedback
In the Destination feed, students can ask a question, reflect on their learning, capture learning, and self-assess based on the success criteria.
Capture Learning
*Note: In order for students to be able to capture their learning, students must have the permission to capture evidence. This can be turned on in the class settings. (Settings → Setup → Students and Parents → Check off ‘Allow Students and Parents to Capture Learning Evidence’. Don’t forget to save!)

To capture learning for a destination, the student must click the ‘+ Capture Learning’ button. This will permit the student to submit a form of media, whether it be a photo, video, voice note, a file, a link, or an artboard. When capturing learning, students will have to add a reflection to their learning before they can submit. This can be a short description of what they are submitting or something else related to what they are submitting. The class section of the capture learning category will be automatically selected based on the class they are currently logged into.
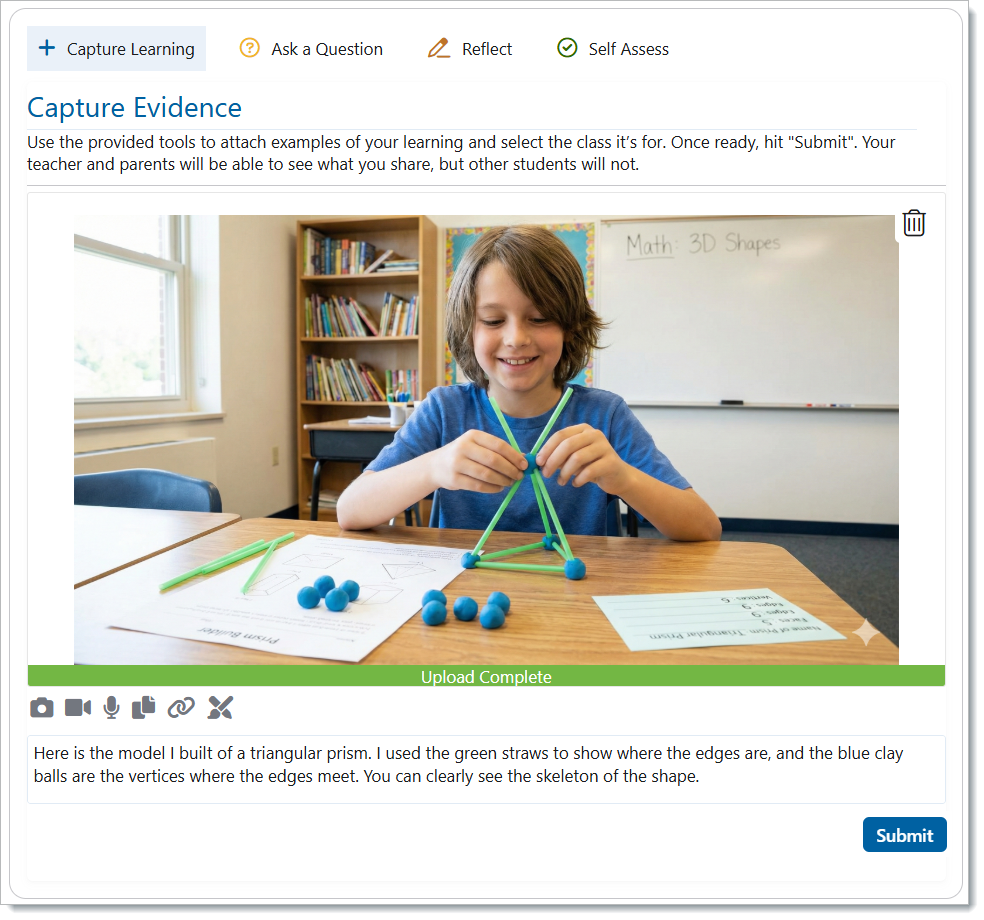
When a student submits Evidence, teachers can like the post or comment on the evidence.
Ask a Question
Students can ask a question by clicking on the ‘Ask a Question’ button, and their question will be posted to the learning feed of the specific learning destination. When a student asks a question, teachers can respond to the question in the feed, and students will be able to like the response or respond.
Reflect
Students can use the Reflect option to reflect on their learning and expand on how they have been working towards the specific learning destination. If teachers ask students to reflect on the learning destination, and they are unsure of what to write, they can direct students to the ‘Get a hint’ button, which will provide students with a prompt that they can use to write their reflection. Teachers will have the option to like and respond to the student’s reflection, as with all other options.

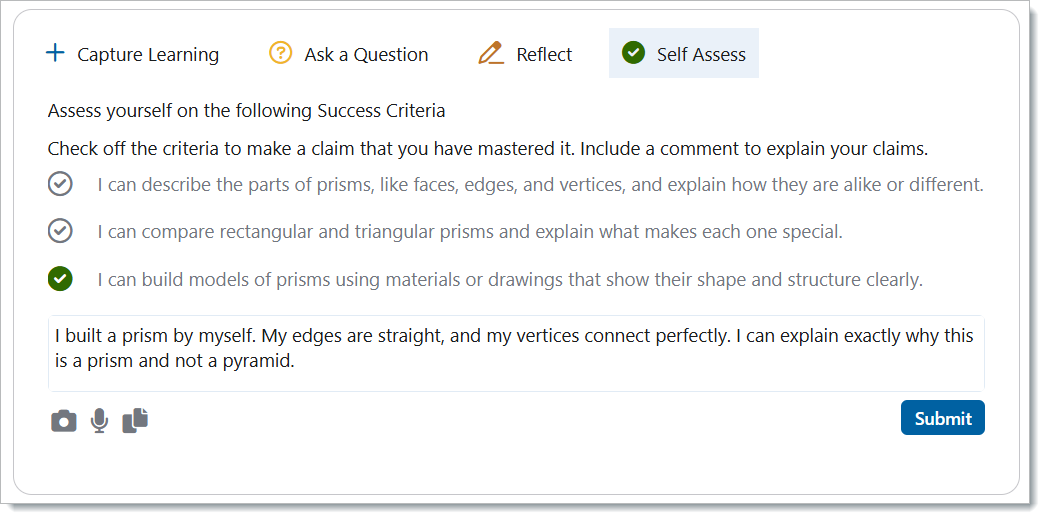
Self-Assess
Students can assess themselves on the success criteria for the learning destination. Clicking on the ‘Self Assess’ button will populate the success criteria for the learning destination. Students can then mark then assess themselves on each specific criteria, putting a checkmark beside the criteria they believe they’ve mastered. Before a student can share their self-assessment, they will need to provide a comment and/or an image/video/voice note/document/link, supporting and proving why they believe they’ve mastered the specific success criteria. Teachers can then comment and like the student’s self-assessment.
Destinations for Students
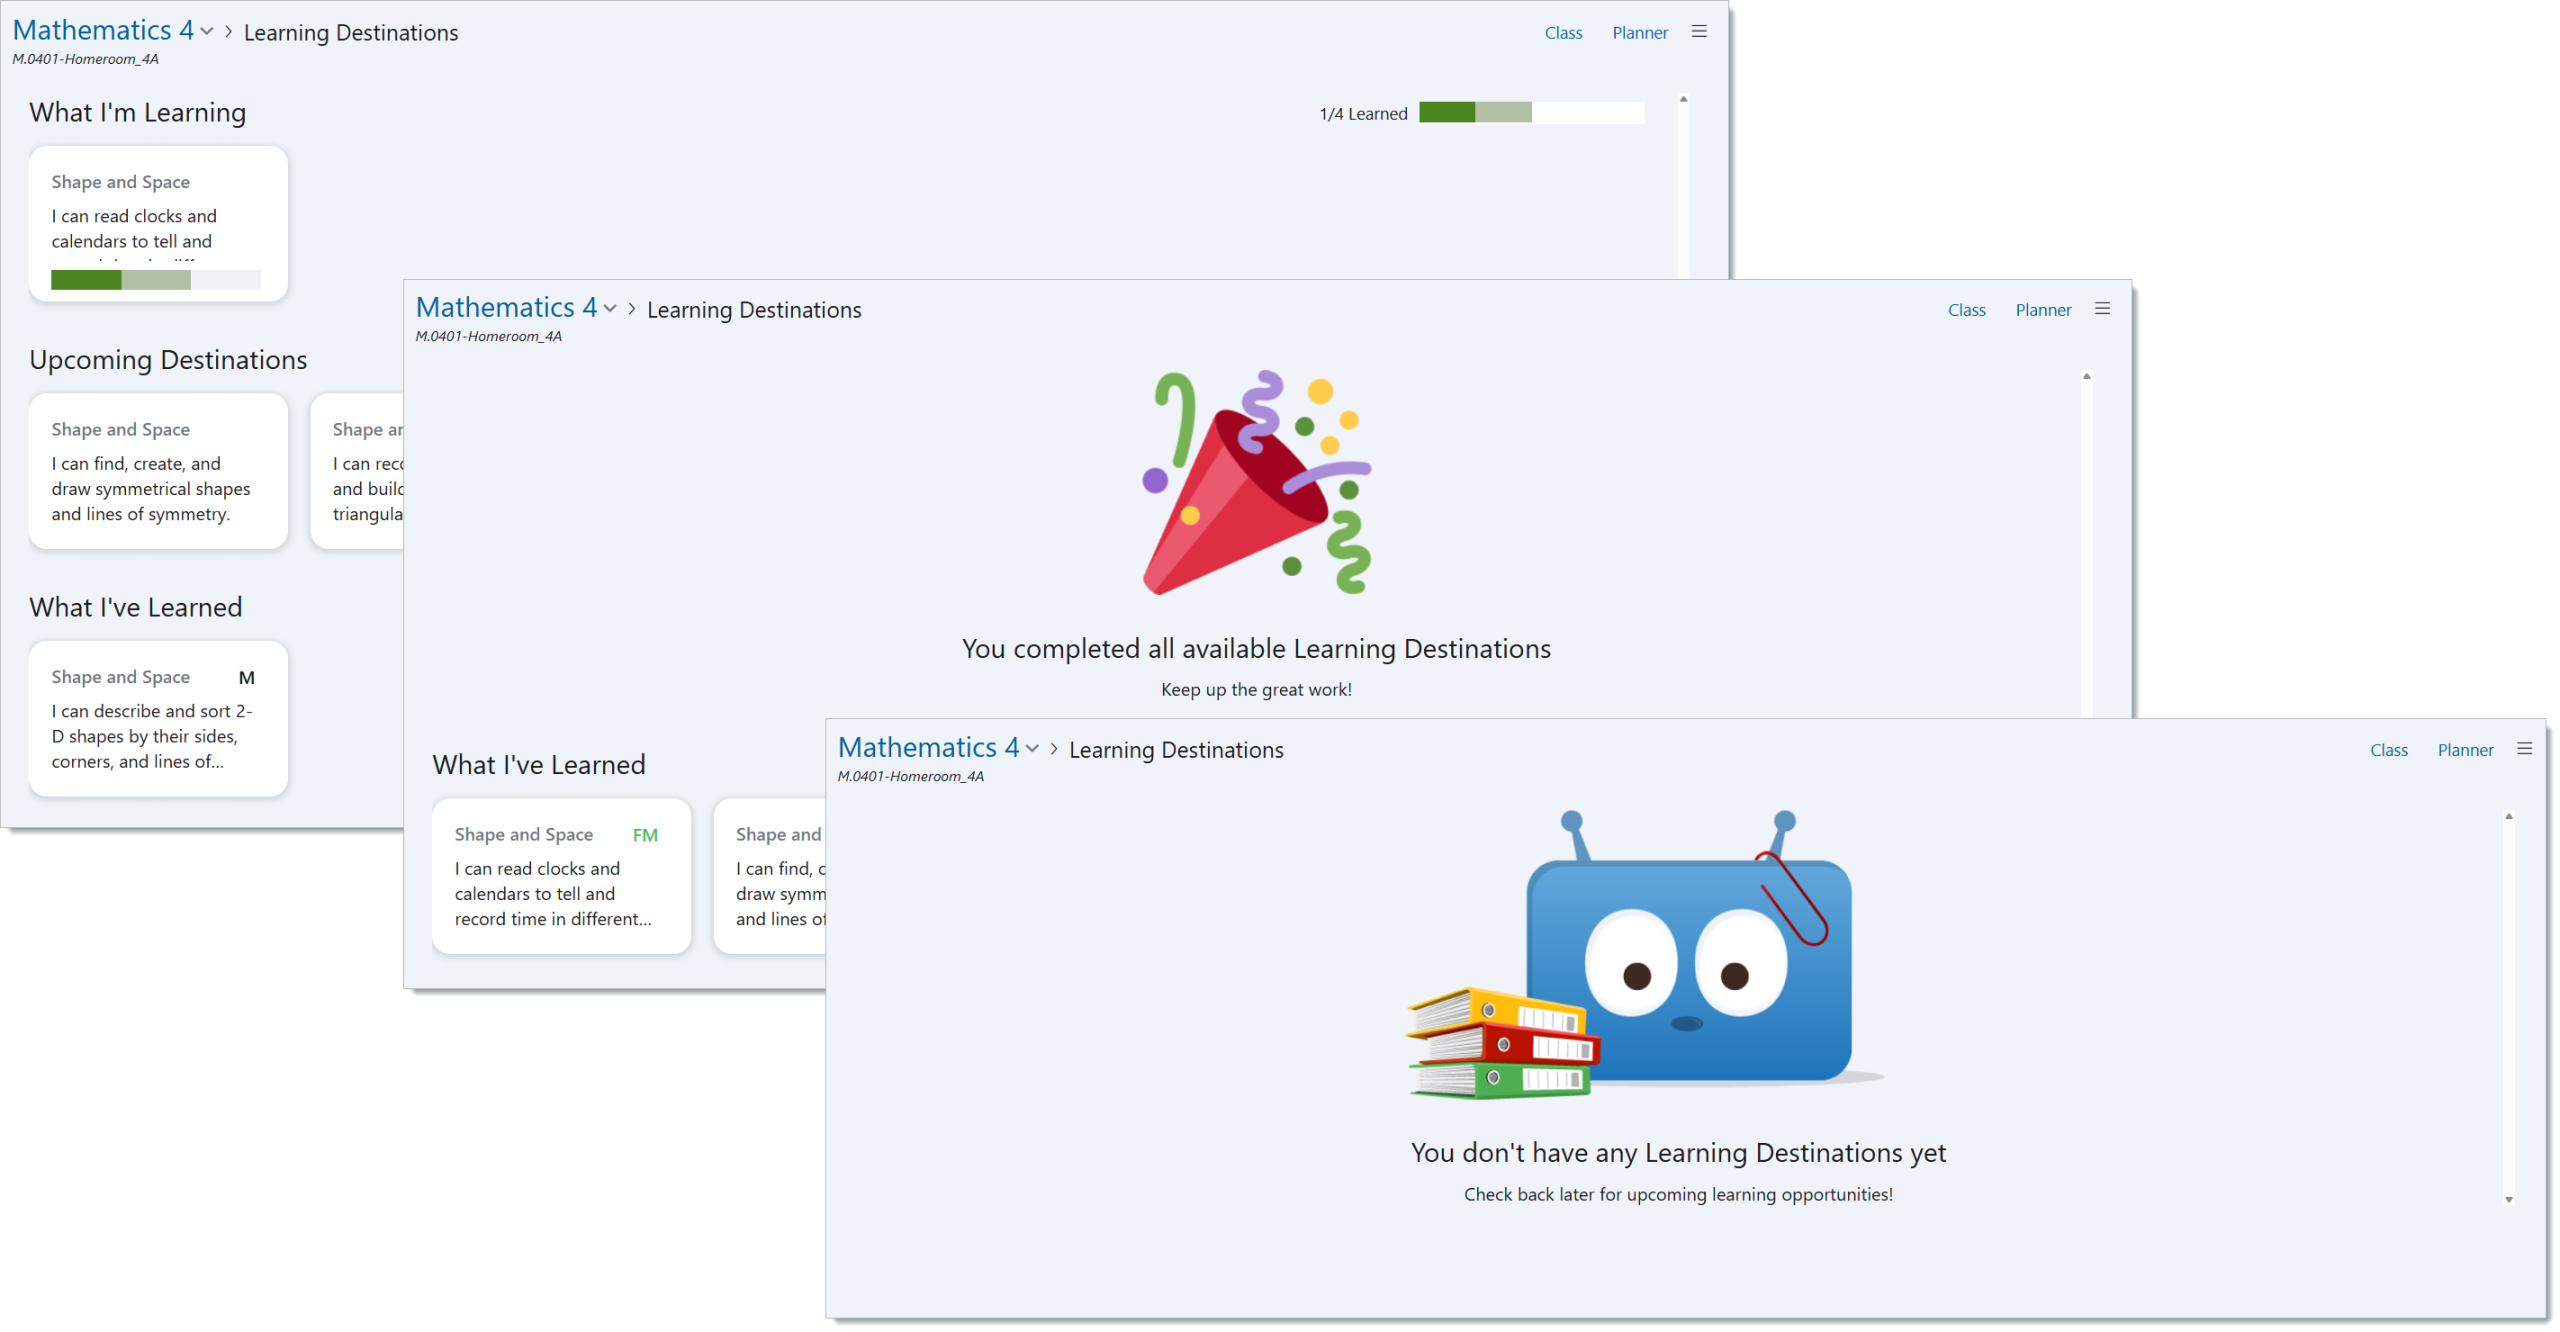
The student view of the Learning Destinations dashboard in Edsby provides a clear, organized snapshot of their learning journey. The dashboard is divided into three main sections: “What I’m Learning,” “Upcoming Destinations,” and “What I’ve Learned.” The “What I’m Learning” section shows the learning destinations the student is currently working on, along with progress bars to track their advancement visually. The “Upcoming Destinations” section outlines upcoming learning goals, helping students understand what they will focus on in the future. The “What I’ve Learned” section highlights completed learning destinations, giving students a sense of accomplishment and a record of their growth. Each learning destination is grouped by subject strands and written in student-friendly language, making it easy for students to monitor their progress and plan their next steps in learning.

Viewing Destinations for the first time as a Student
For students accessing Learning Destinations for the first time, they will need to select the ‘Destinations’ tab in the class. This will bring them to the Destinations dashboard. When a student views Destinations for the first time, they will see the Destinations Dashboard with the Upcoming Destinations, where they will find the learning cards. As opposed to the screenshot above, students will not see the ‘What I’m Learning’ until they start working on a specific learning destination. At the beginning, students will see the category ‘Upcoming Destinations’ with all the destination cards, as shown below.
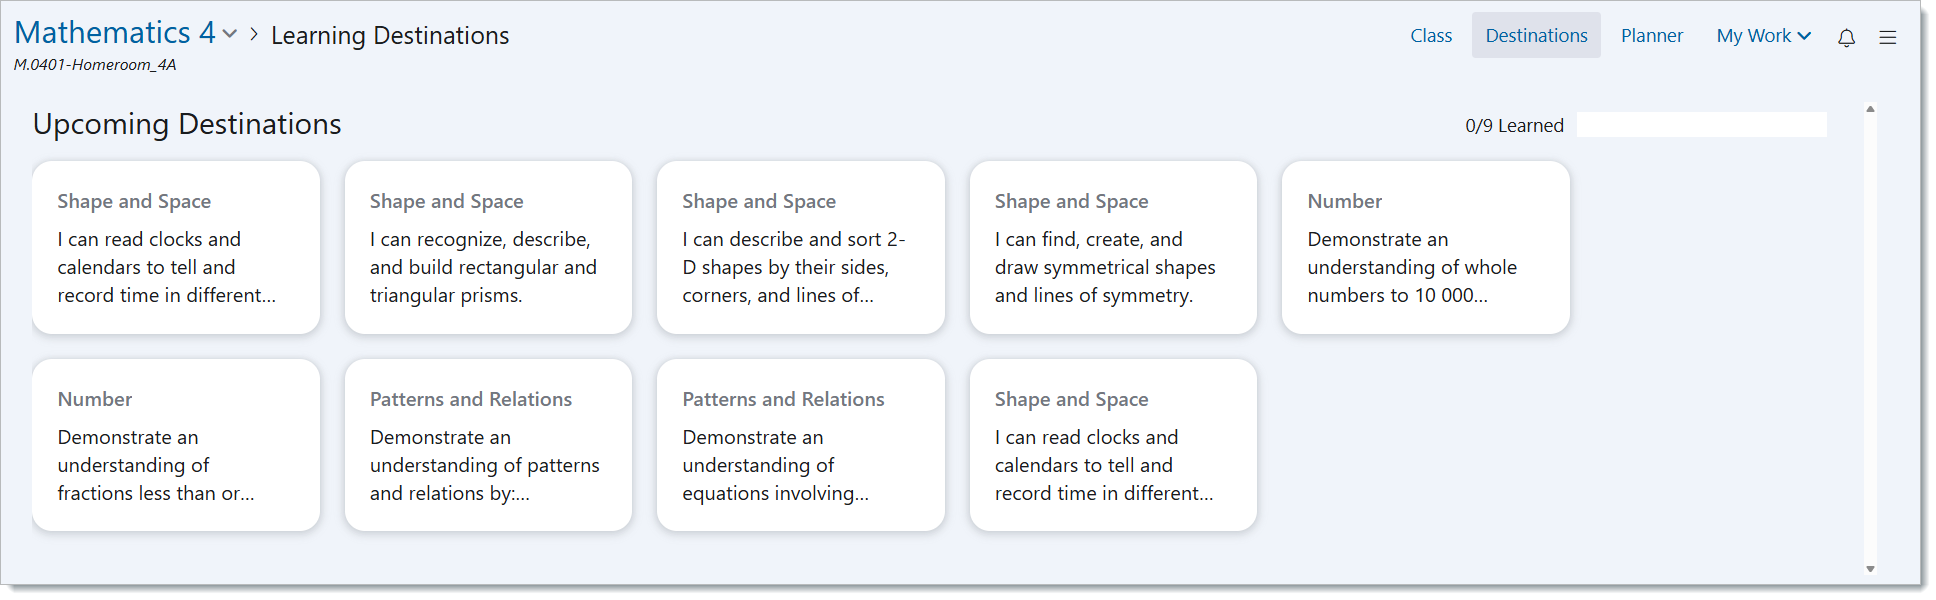
If destinations are not written in student-friendly language, the destinations will appear as the strand name, as in the curriculum.
When Destinations are in Progress
When students are working on a Learning Destination, the progress bar will track their progress with regards to the completion of their Success Criteria. There are 3 colours that will appear on the student’s progress bar: Dark green, which means attained criteria, light green, which means claimed criteria, and white, which means unclaimed and unattained criteria. However, the progress bar will not appear if there is no success criteria.
The overall progress bar tracks the student’s progress across all Destinations. Students can continue to work on their in-progress destinations by clicking on the appropriate card and they will be able to view the work they have done thus far. If a student would like to start a new destination, they can navigate below to the ‘Upcoming Destinations’ section and select the destination card they wish to work on next.

Attained Destinations
When a student has attained a Learning Destination, they will see the attainment level at the top right of their learning destination card. They will also see a time stamp for the start date and attainment date of the destination.
Once a student has attained the destination, the destination card will move from the ‘What I’m Learning’ category to the ‘What I’ve Learned’ category, as shown down below.

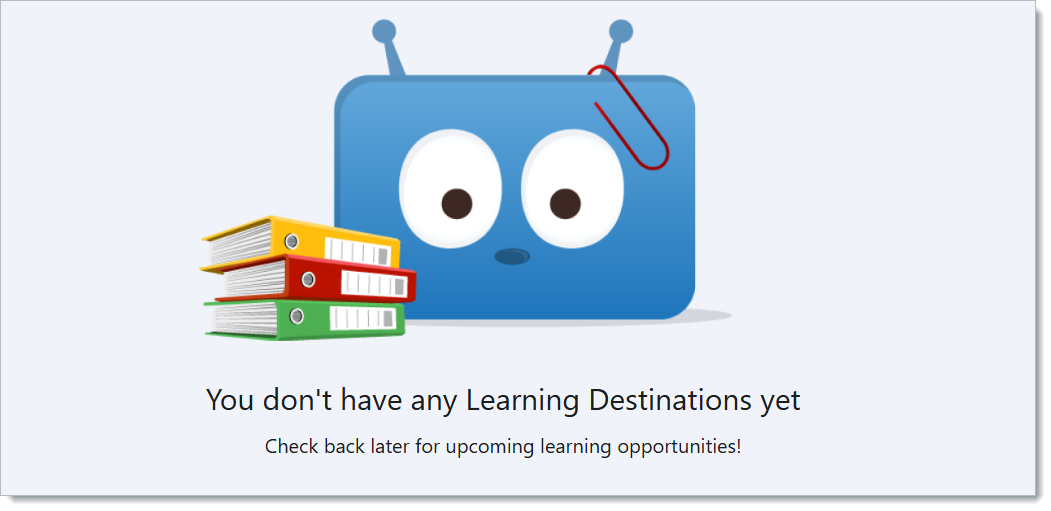
Hidden Destinations for Students
When a destination is hidden from students it will not appear until you unhide the destination. If all destinations are hidden, students will see an empty state of Destinations, as pictured below.
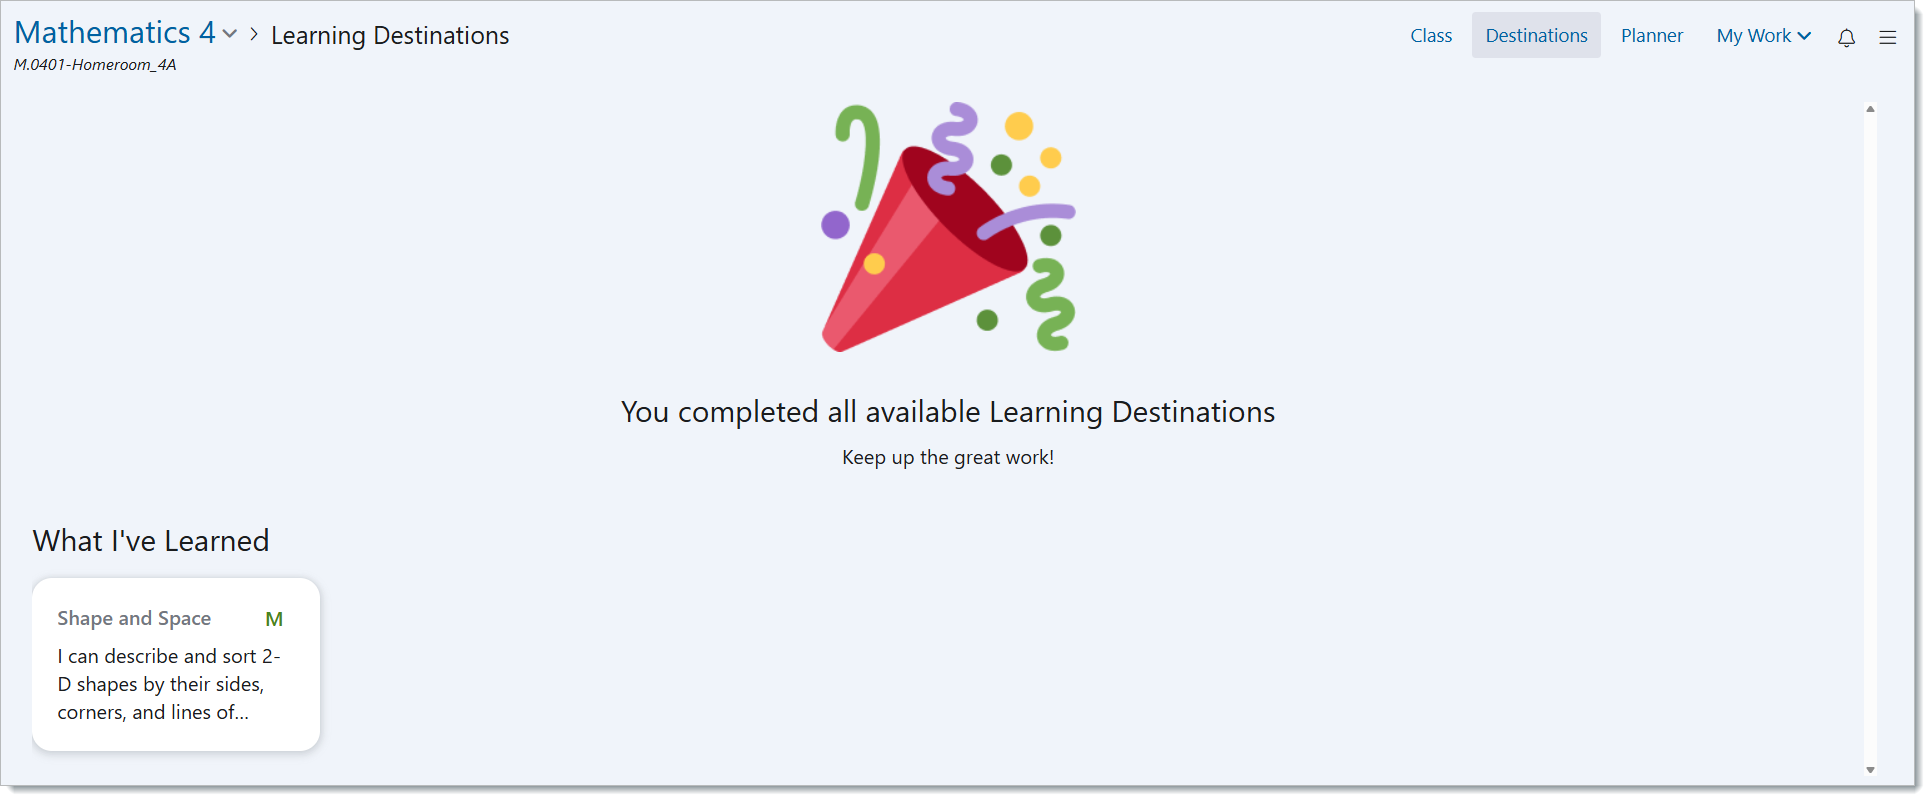
Completed Destinations
When a student has completed all destinations, they will see a completed message, along with the attained destinations below.
What can Parents see?
When Parents open the Destinations Dashboard for their child, they will have a similar view as a student. Parents will see the three main sections: “What I’m Learning,” “Upcoming Destinations,” and “What I’ve Learned.” The “What I’m Learning” section shows the destinations their child is currently working on, along with progress bars to track their advancement visually. The “Upcoming Destinations” section outlines upcoming learning goals, helping students understand what they will focus on in the future. The “What I’ve Learned” section highlights completed learning destinations, enabling parents to see a record of their child’s growth.
Parents have view only access to Destinations, they can see any Evidence, Assessments, notes, or self-assessments linked by clicking on a Destination. Parents cannot edit or add to a Destination.
