
The focus of Edsby’s learning evidence system is to support the assessment, evaluation, and reporting practices of K-12 teachers.
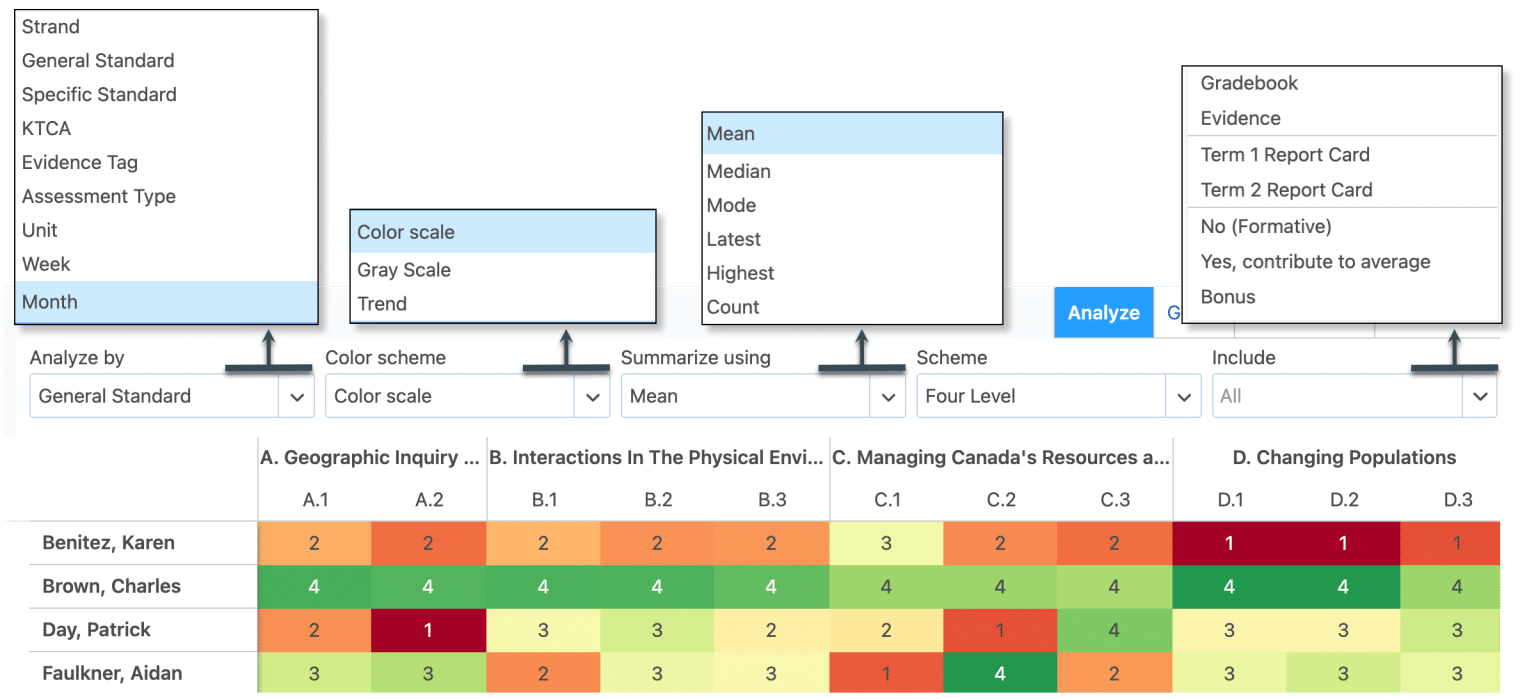
The Perspective Analyze tool works together with Evidence and the Gradebook to enable teachers to see the results of both types of assessments in one place. Analyze empowers the teacher to look at the assessment data in multiple ways to spot trends or areas of concern and act on the information.
Edsby provides teachers with purpose-built tools to capture evidence. Once captured, Edsby provides innovative tools to organize and analyze the evidence. Teachers can create learning stories to share with parents. When report card time arrives, teachers can use the evidence to build formal learning communication.
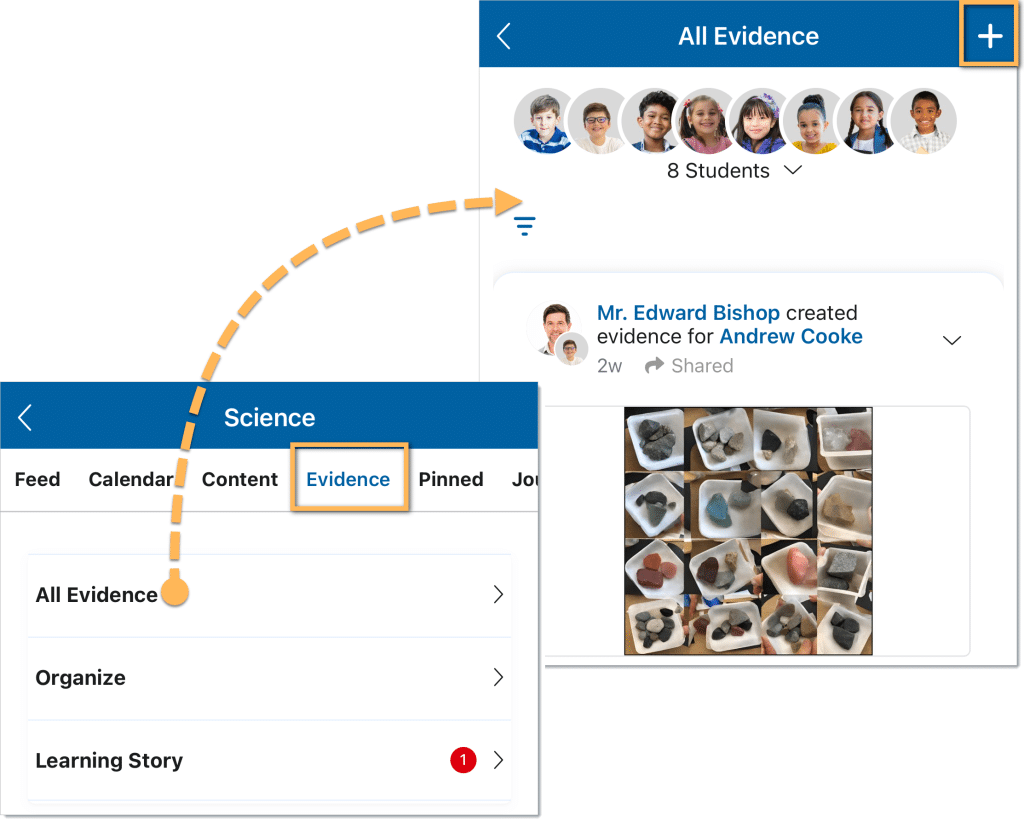
Evidence can be gathered from a web browser or mobile device. New Evidence can be gathered directly on the home screen of a teacher’s Edsby account or from within a specific class.
Teachers can add New Evidence by clicking or tapping the New Evidence button in the Classes panel.
If teachers are already in a class, they can access learning evidence by clicking Evidence in the top menu bar of the class.

Evidence can also be captured using the Edsby Capture App. For more information on Edsby Capture, click here.
Jump to a Section
About the New Evidence Form
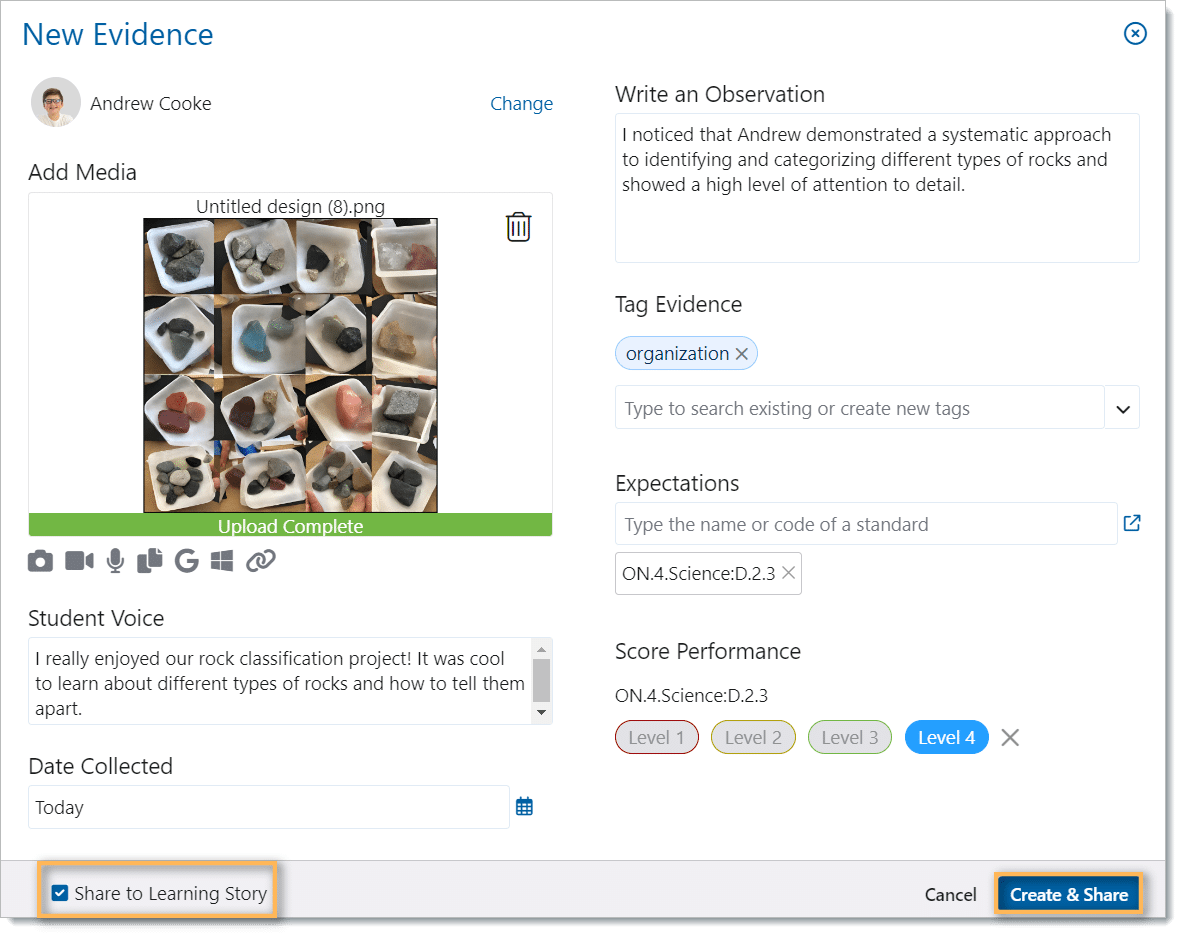
After a teacher has clicked New Evidence, they can choose which students the evidence applies to by clicking their pictures and clicking Select Student.
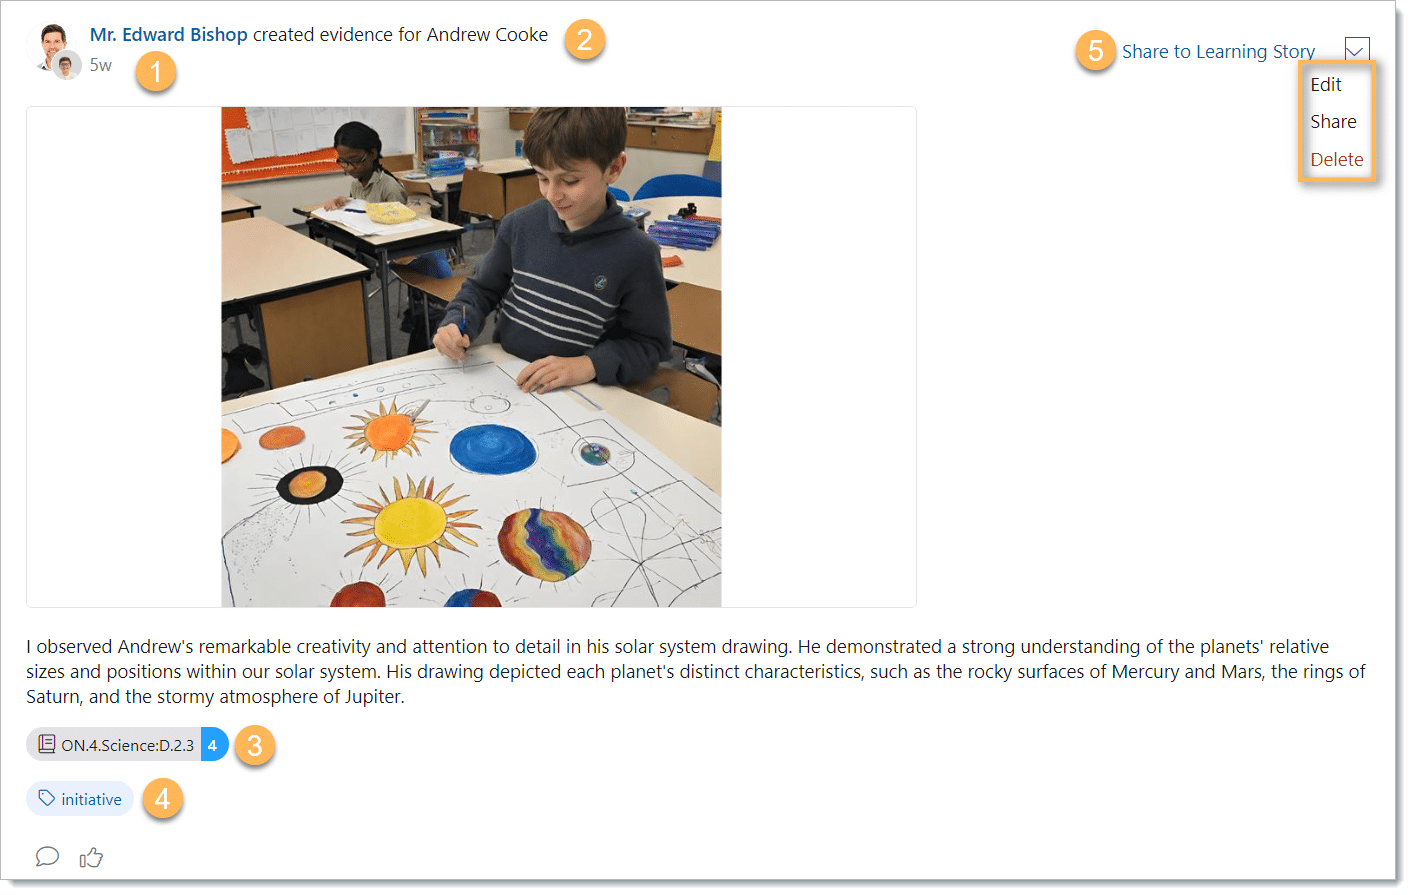
When the Evidence Form appears, the teacher has the option to add media, document the student’s voice, set the collection date, write an observation, add a tag, add expectations or standards, and score the student’s performance.

To add any media, choose one of the icons. Teachers may also have access to additional icons. Available options will depend on the device. For example, the video and camera options won’t be available on a laptop without a camera. Teachers can also upload files from Google Drive and Microsoft OneDrive.
To record a student’s reflection on his or her learning, click Student Voice. To record an observation about a student, select Write an Observation. Tagging the evidence helps teachers to organize the evidence based on their own criteria. To add a tag, select one from the tags list, or write a new one in the text box. Select Expectations to link expectations, standards, or outcomes to the piece of Evidence. Teachers can also choose the date that the evidence was collected. To add or remove students, click Change.
To share the evidence with the student and their parents or guardians, select Share to Learning Story. Once the Share button has been selected, the Create button will change to Create and Share. Students and parents are able to view this shared evidence by navigating to the student’s Learning Story.
Optional Formative Scoring
Teachers may want to score evidence items on a quantitative scale. In Edsby, a simple 4-level option is available when gathering new Evidence or editing previously documented Evidence. The 4-level scoring scheme is found under Score Performance in the New Evidence form.
The scale features levels of different colors indicating the level of performance – Level 1 being red and Level 4 being blue. Click the X to remove the selected level if the Evidence does not require quantitative scoring. The level assigned to a specific piece of Evidence is visible in the Organize tab under the Evidence it corresponds to.
Evidence scores are never shared with students and parents.

Activities
Activities combine structure and creativity, giving teachers a smarter way to engage students and capture learning. Activities guide students as they submit evidence of their learning, making expectations clear and easy to follow. Teachers can assign Activities to the whole class or tailor them for individual students to support differentiated instruction and every Activity can be linked to the curriculum and pre-tagged. Student submissions automatically retain these connections—saving time and keeping everything organized. An Activity can be as simple as a written or recorded instruction, or as dynamic as an interactive worksheet using an Artboard. With Artboards, students can draw, label, and create—unlocking new ways to demonstrate their understanding.
Teachers create Activities within Evidence through the New Activity button. For the students, the Activities appear in their Learning Story, in the Activities panel.

To create an activity, navigate to All Evidence and click New Activity. Enter the Title of the activity and add media files or create an Artboard by clicking the brush and pen icon. Students will receive a personal copy of the Artboard and will be able to edit their copy. Provide instructions for students. Add a tag for organization and add Expectations. The teacher will see the expectation/outcome on all student submissions. If updates are required, click Save as Draft. To post to the students’ Learning Story, click Save and Share.

Note: Tags are never visible to students or families. Expectations are only visible to students and families once the teacher shares the completed activity and confirms the evidence meets them.
To complete an activity, a student first navigates to their Learning Story. Then they select an activity from the Activities panel and follow the teacher’s instructions. The student can complete and submit the activity or save it as a draft for later submission.

For more information about activities, click here.
Organizing and Viewing Evidence
Edsby’s Evidence system enables teachers to organize and view their Evidence in multiple places with multiple filters.
All Evidence
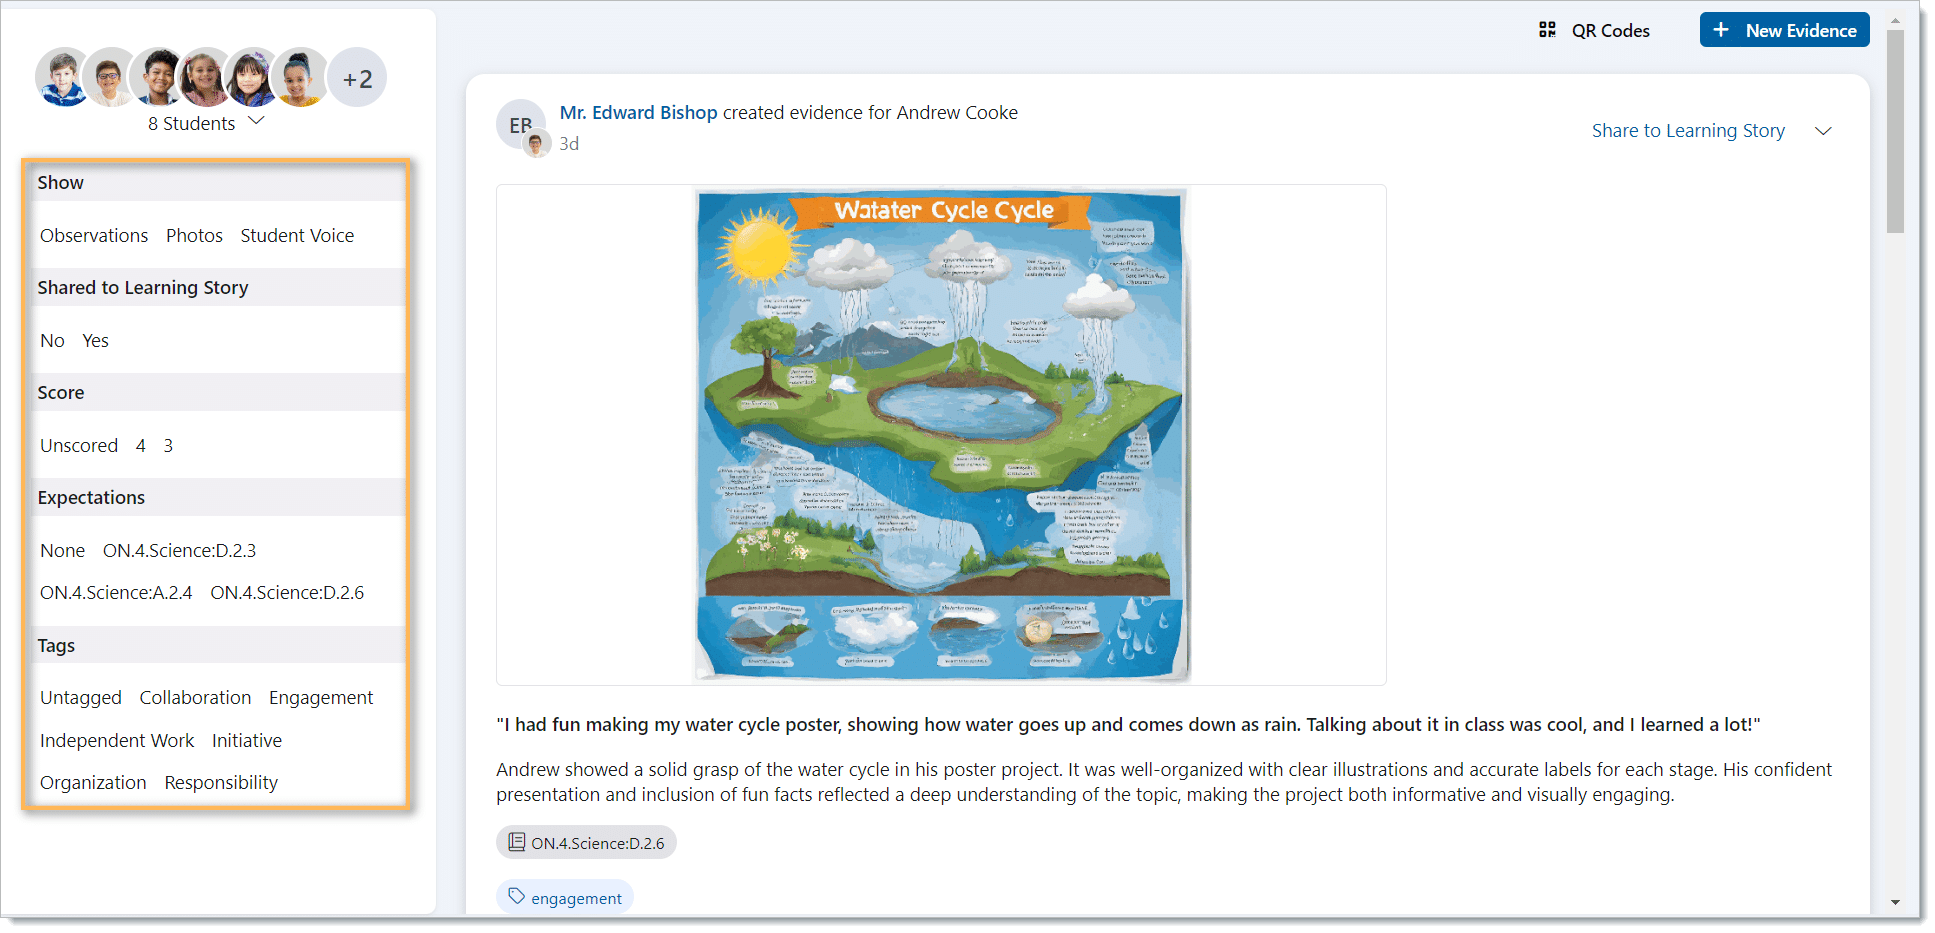
The All Evidence tab enables teachers to view all Evidence that has been collected for all of the students in that class, including Activities and Evidence submitted by the students. The newest Evidence is listed at the top of the feed, but teachers can filter the feed by students, what’s included in the Evidence, whether or not it has been shared to the student’s Learning Story, performance scoring, expectations, and tags.
Teachers can select single or multiple students or the entire class by clicking on the drop-down arrow and choosing All Students, Single or Multi-select, or selecting specific students from the list.

All Evidence displays all of the information for each piece of Evidence including:
- Who created the Evidence
- Which student or students the Evidence was created for
- The performance score assigned to that Evidence
- Any tags associated with the Evidence
- Whether or not it has been shared to the student’s Learning Story
Teachers can also Share, Unshare, and Edit Learning Evidence here.
Teachers can also communicate with parents, students, and other co-teachers about a piece of Evidence using the comment or like buttons. Selecting Share to Learning Story enables parents and students to view the comment in the student’s Learning Story. Leaving this box unselected makes the comment visible only to other co-teachers. If the Share to Learning Story button is disabled, it indicates that the Evidence item has not been shared.

When parents and students reply to a piece of Evidence, it is included in the All Evidence feed. For example, Mr. Bishop noted that Andrew has been working hard to catch up on his science project and would benefit from more time to work on it at home. Andrew’s parent wants to let Mr. Bishop know that he has been working hard at home too and . When the parent replies to the Evidence, the reply can be seen both in the All Evidence feed and in the student’s Learning Story.
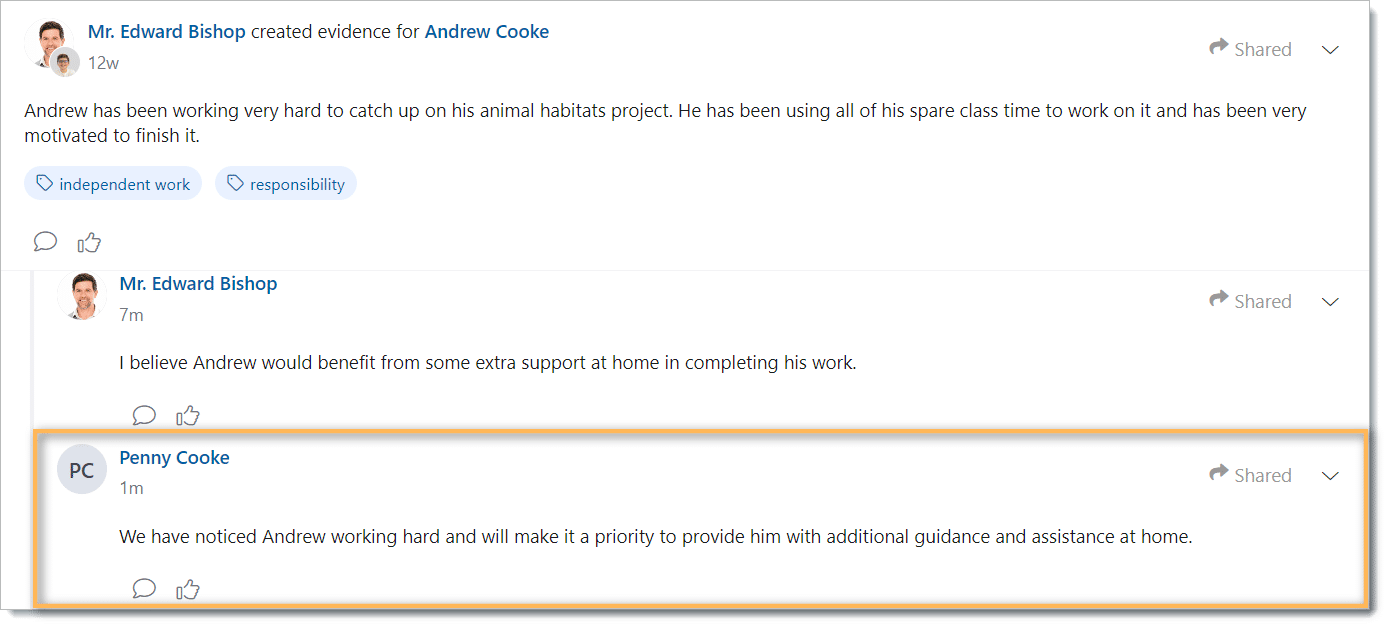
When teachers create and share Evidence for multiple students, the Evidence is shared with all of the students and parents listed on the Evidence. When a parent comments on the Evidence, that comment is only visible to that parent, their child, and the teacher.
Other students and parents will not see any comments that are not from the teacher or their own child.

QR Codes
Teachers can easily print a class list of QR codes that can be used with the Edsby Capture App to quickly create new evidence items. To print the list, click QR Codes.
Teachers can also allow students and their parents to access their unique QR Codes from home. This is done by selecting ‘Allow students and parents to Capture Learning Evidence’ in the Class Setup form under Students and Parents, the student panel, or from the All Evidence Page.
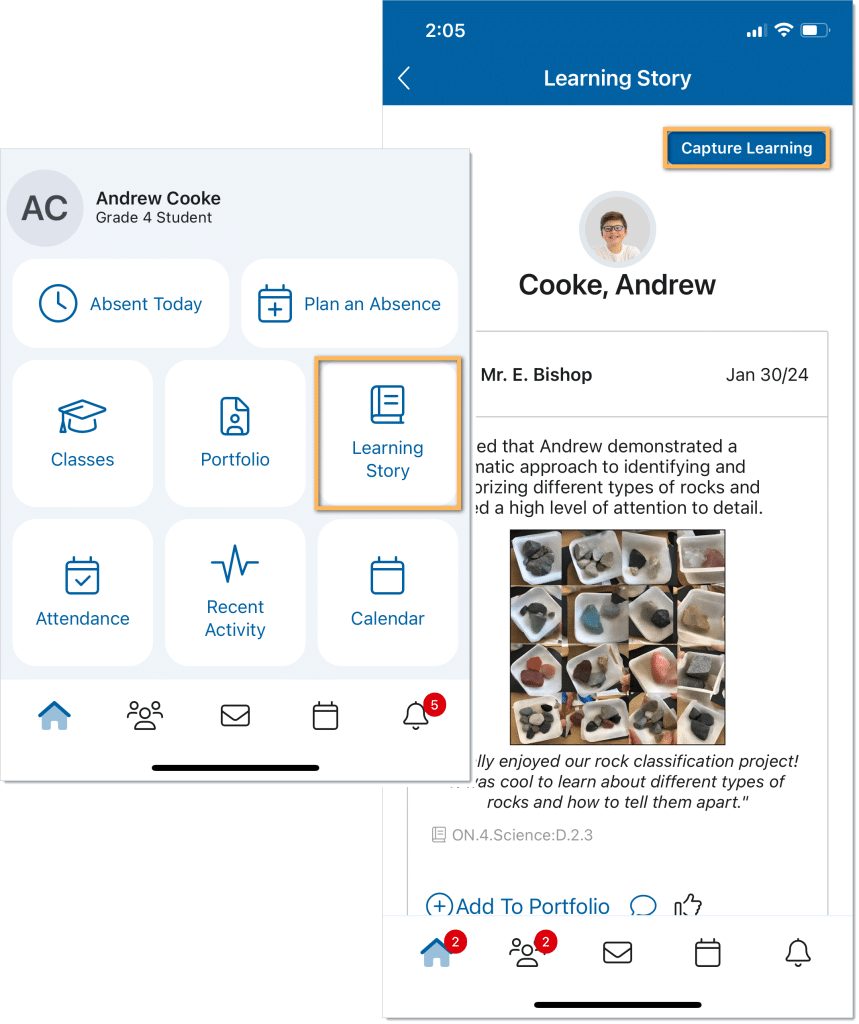
Students and their Parents access their QR Codes from the student’s Learning Story.

Students and parents only have access to the QR Codes associated with them – the QR Codes of other students are not accessible.
When teachers enable students and parents to capture Learning Evidence, they might want to provide instructions on how to do so, or on how to find Evidence that the teacher has shared. The following are examples that teachers can share in their classes to guide and assist students and parents.
For families:
“I will be sharing student progress to their Learning Story. Navigate to your child’s Learning Story from the Home Screen on the Edsby mobile app.”
For students and their families to submit Evidence:
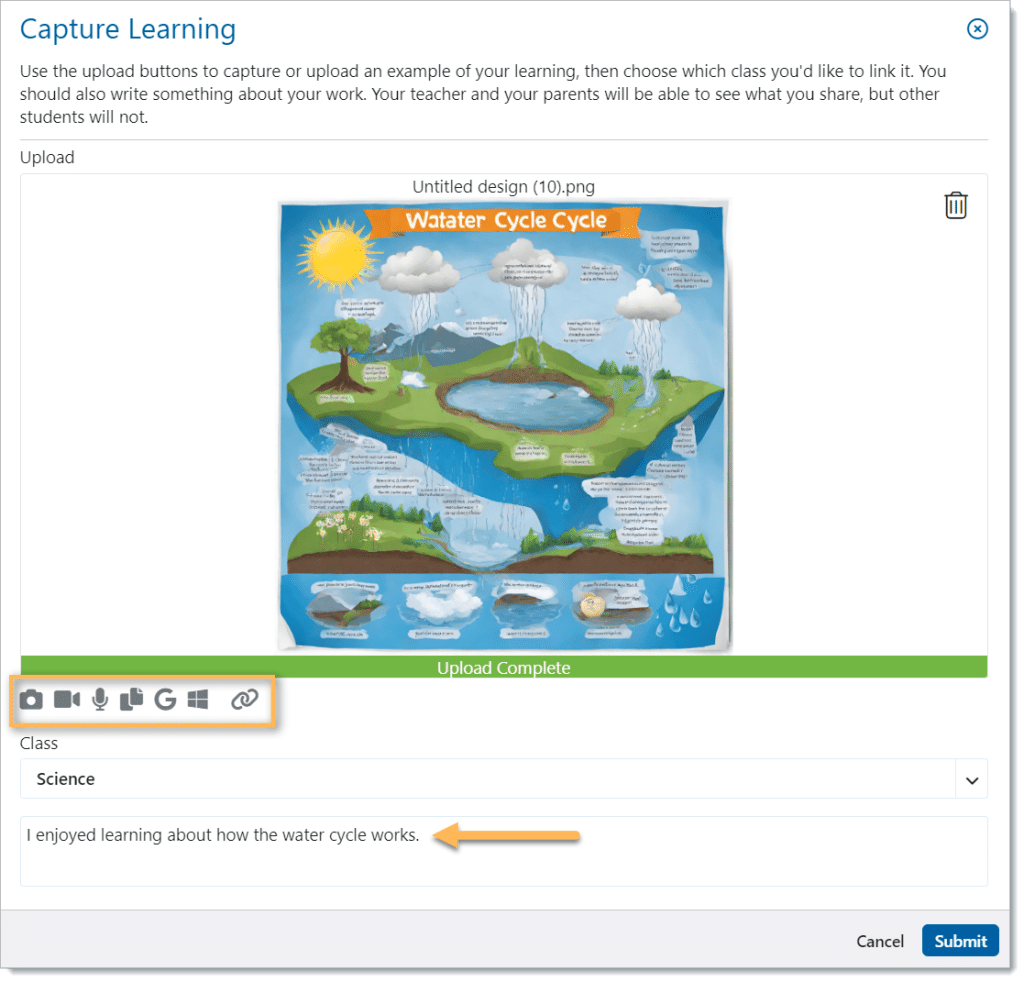
“I’ve enabled students to submit their own Learning Evidence. To accomplish this, go to your Learning Story, click on “Capture Learning,” and you can upload a picture or video while providing insights about your work. Additionally, you can utilize the Edsby Capture app by scanning your unique QR code.”
For families of younger students:
“I’ve enabled families to contribute their child’s learning evidence. Access their Learning Story, select “Capture Learning,” and include a photo or video with comments about their work.
Alternatively, utilize the Edsby Capture app by scanning the QR code.”

Organize
The Organize section enables teachers to focus on either one student or a selection of students and review and analyze the evidence. Teachers can view their collected evidence for these students by clicking the drop-down arrow and selecting the students from the list.
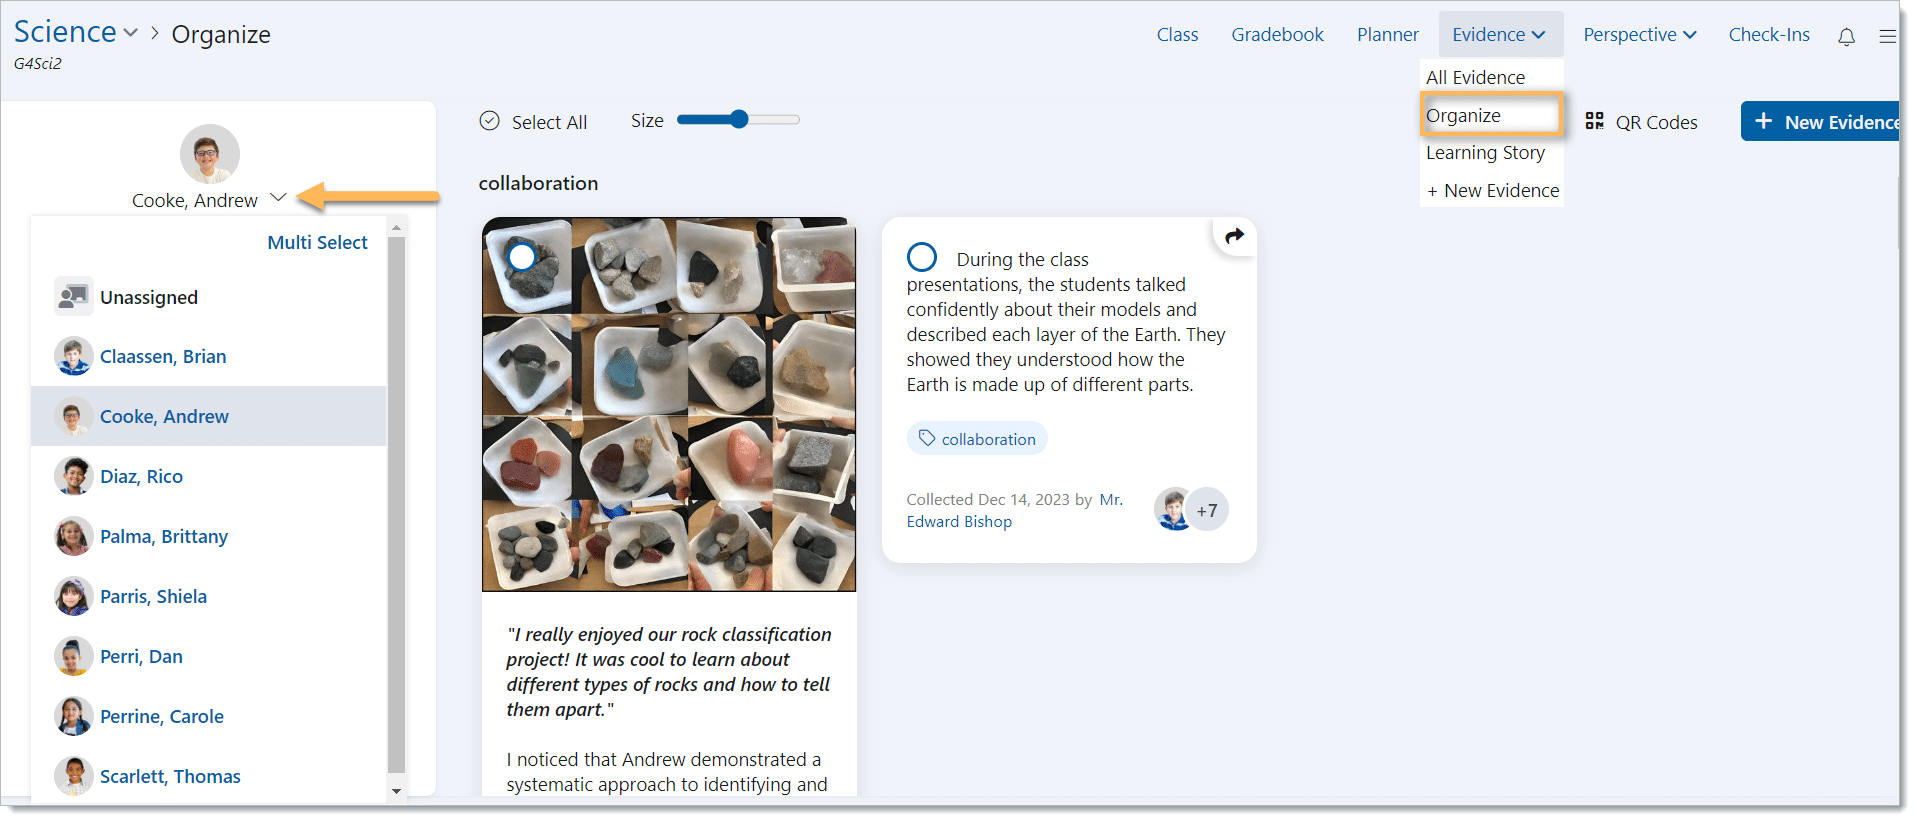
The teacher has gathered several pieces of Evidence for her students. The Evidence includes the teacher’s observations and most items include Expectations. Some of the Evidence has been shared. A few of the items included the student’s voice and some items have teacher-generated tags.
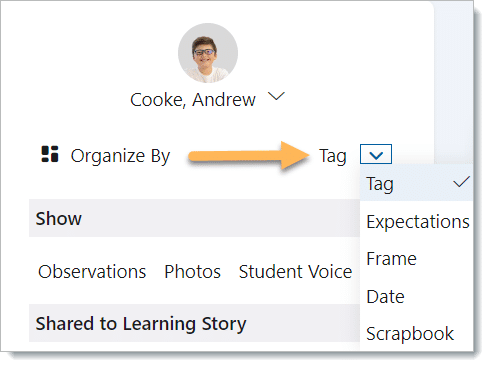
The Organize by selection enables teachers to sort the evidence based on teacher-generated tags, expectations, frames, and dates.
Items that have been linked to an expectation are sorted by the encompassing frame. When evidence is linked to more than one frame, the evidence will appear in each frame.
Items not linked to an expectation will be listed under “Other Evidence”.

The filters enable teachers to focus on items that match their choice. In this example, the evidence is organized by Date but is filtered to show only evidence that includes the student’s voice and has been scored. To see all the evidence, remove the filters.

Underneath each piece of learning evidence is the date the evidence was captured along with the name of the person who captured the Evidence and the student or students whom the Evidence was created for.

The Scrapbook view enables the teacher to visually organize the evidence. Initially, all the evidence is stacked neatly in one corner. Begin to organize by dragging the evidence into groups
In the Scrapbook organizational view, teachers can create Sticky Notes. The Sticky Notes are only visible in the Scrapbook view.

Applying Tags
To add additional tags, select one or more items, then click Apply tags. The tag will be applied to all selected evidence.
Evidence can also be shared or unshared to the students’ Learning Story this way.

To edit any piece of Evidence, double-click the Evidence.
Viewing Evidence for Dropped or Transferred Students
Teachers can review the Evidence of students who were previously in their Class and have been dropped or transferred. Dropped students are found at the bottom of the student picker list with the label Dropped. Click the student’s name to view any previously collected Evidence. When students are transferred to a different class, their Evidence follows them. The new teacher will be able to see any Evidence collected by the old teacher and will include the old Teacher’s name under ‘Collected by’.
Analyze Evidence
The Organize section enables a teacher to analyze the collected evidence.
Creating a New Analysis
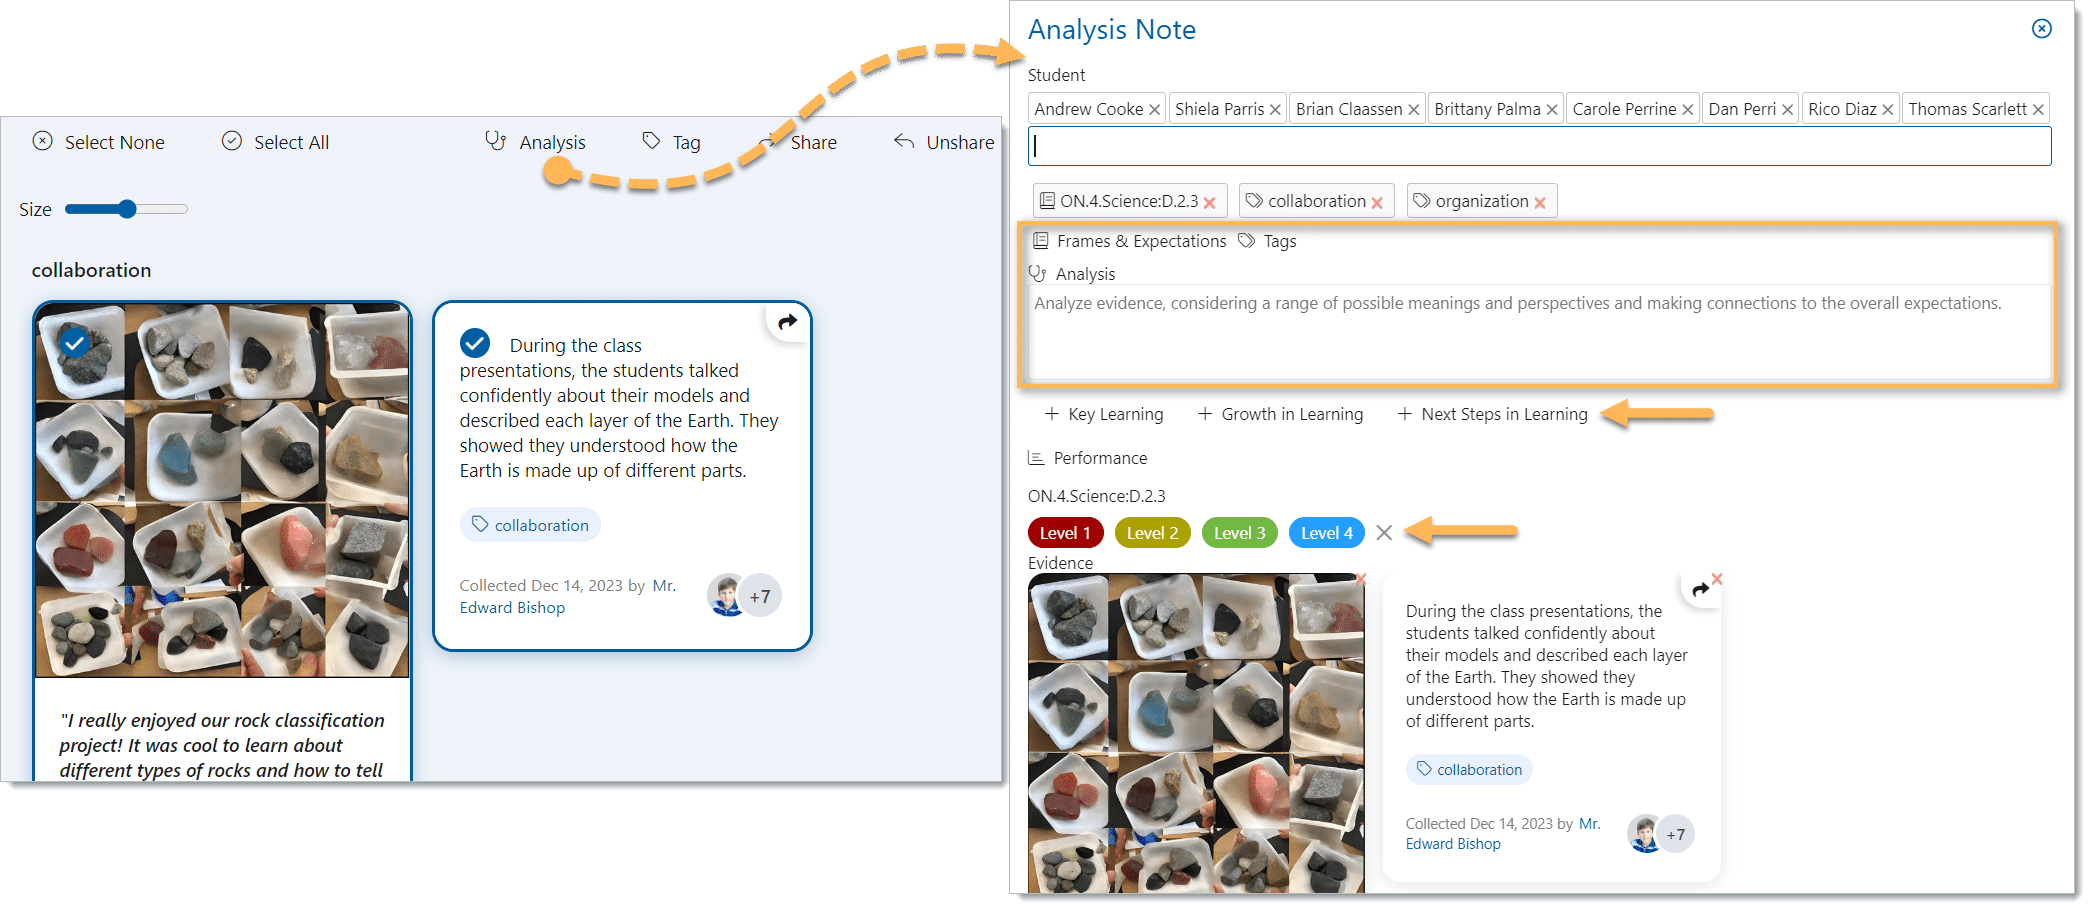
Select one or more items then click New Analysis. Analysis Notes within the Evidence system can include other analysis notes as well as Evidence items.
The form will be prefilled with existing Frames and expectations and tags.
To add additional expectations, click Frames & Expectations. To add additional tags, click tags. In the Analysis box, add the analysis of the evidence. Consider a range of possible meanings and perspectives and make connections to the overall expectations.
To include key learning, growth in learning, or next steps in learning, click on the text to reveal an additional entry box.
Edsby enables teachers to have the option to score an Analysis note with a performance indicator in the same way they can score individual Evidence items.
As with Evidence items, teachers can score each expectation individually, and scoring is optional.
Learning Story
The Learning Story section provides the teacher(s) of the class a feed of which evidence items have been shared with the student and parents/guardians of the student.

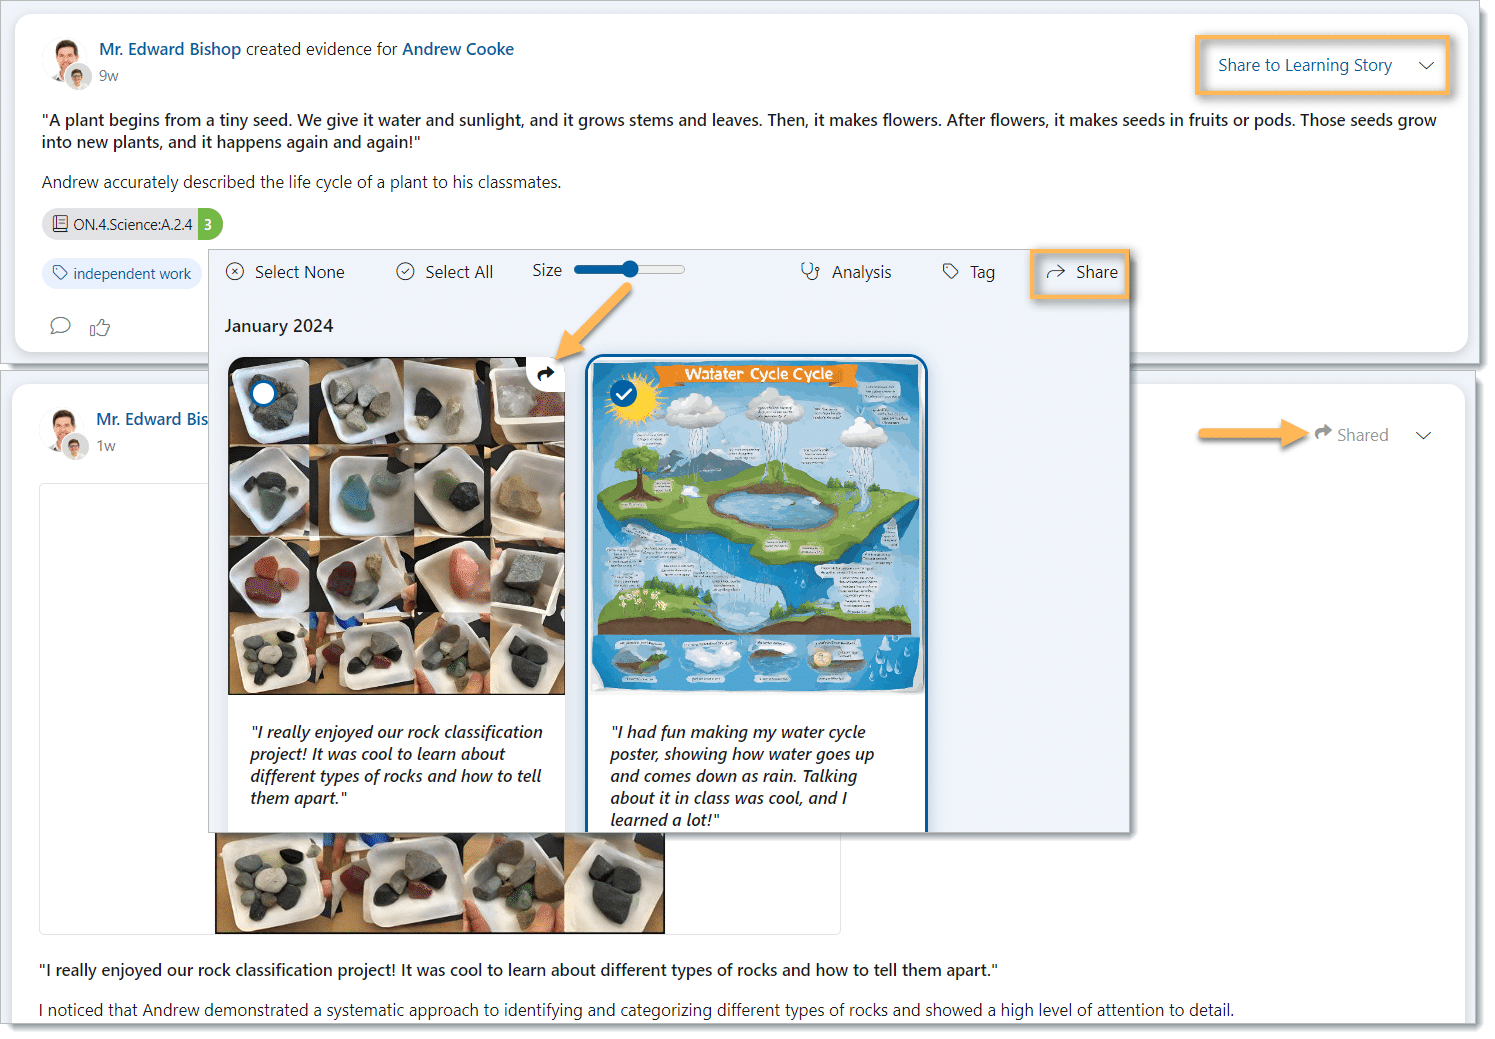
When adding New Evidence, teachers have the option to share it with students and parents. Clicking this shares the Evidence with both students and their parents in the student’s Learning Story.
The Organize section also enables teachers to select one or more items to share with parents after a piece of evidence has been collected. Selected items are highlighted in blue. Click the share button to share the Evidence with students and parents, or click the Unshare button to unshare Evidence with students and parents.
The All Evidence and Organize tabs provide an arrow indicator for Evidence items that have been shared with students and parents. The arrow is visible in the top right corner of the shared Evidence.
This enables teachers to quickly see which pieces of Evidence have been shared and which haven’t.
Parent View of Learning Story
Parents can view their child’s Learning Stories by clicking the button under the child’s classes.
Here, any evidence items the teacher has chosen to share in the student’s Learning Story will be visible.

Information for Kindergarten Families can be found here.
For more information on capturing mobile evidence, click here.
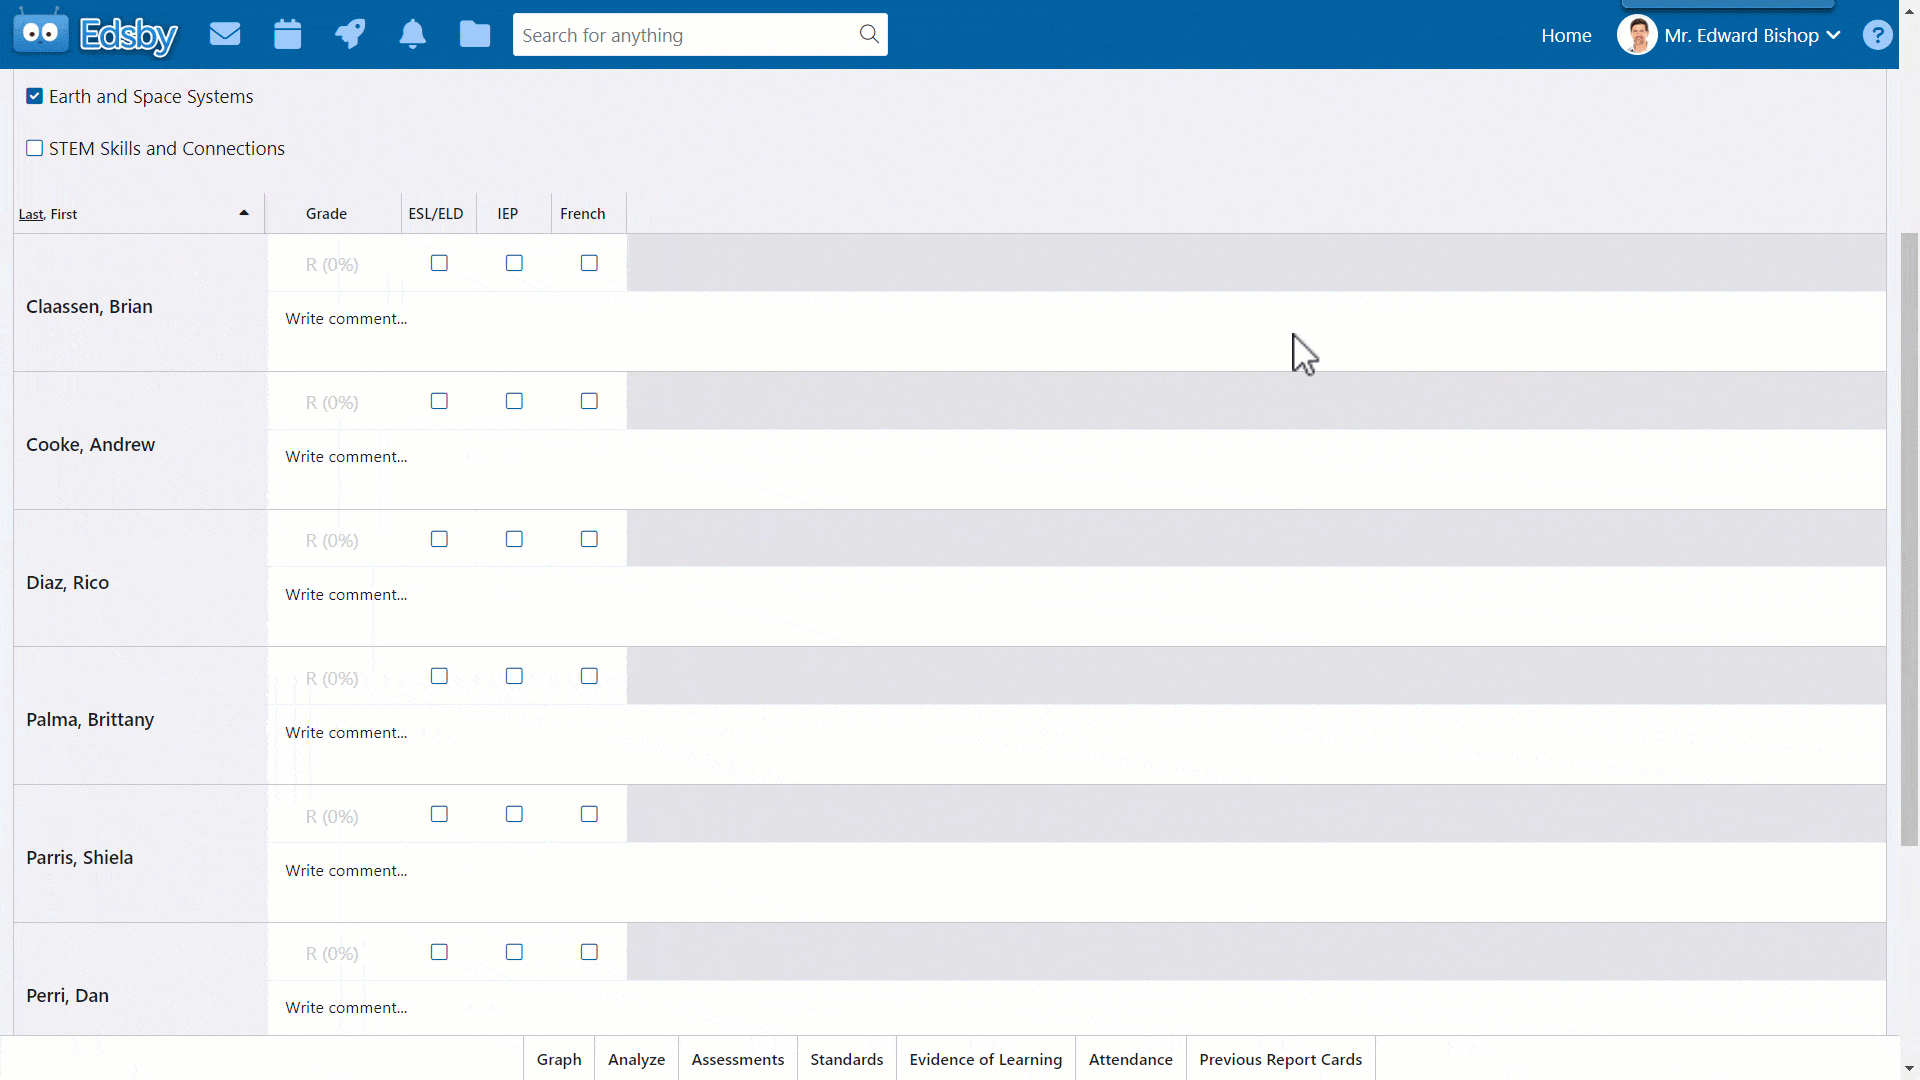
Evidence in Report Cards
Teachers utilizing Evidence and Analysis Notes can effortlessly transfer text from these notes directly into report card sheets through a convenient drag-and-drop process. This makes it extremely easy for teachers to leverage the work they’ve done through the year and make communicating the learning faster and more effective.
To add Analysis Notes or Evidence items to report cards, navigate to the Report Card. A list of the students in the class will appear with options to add their averages and comments to the report card.
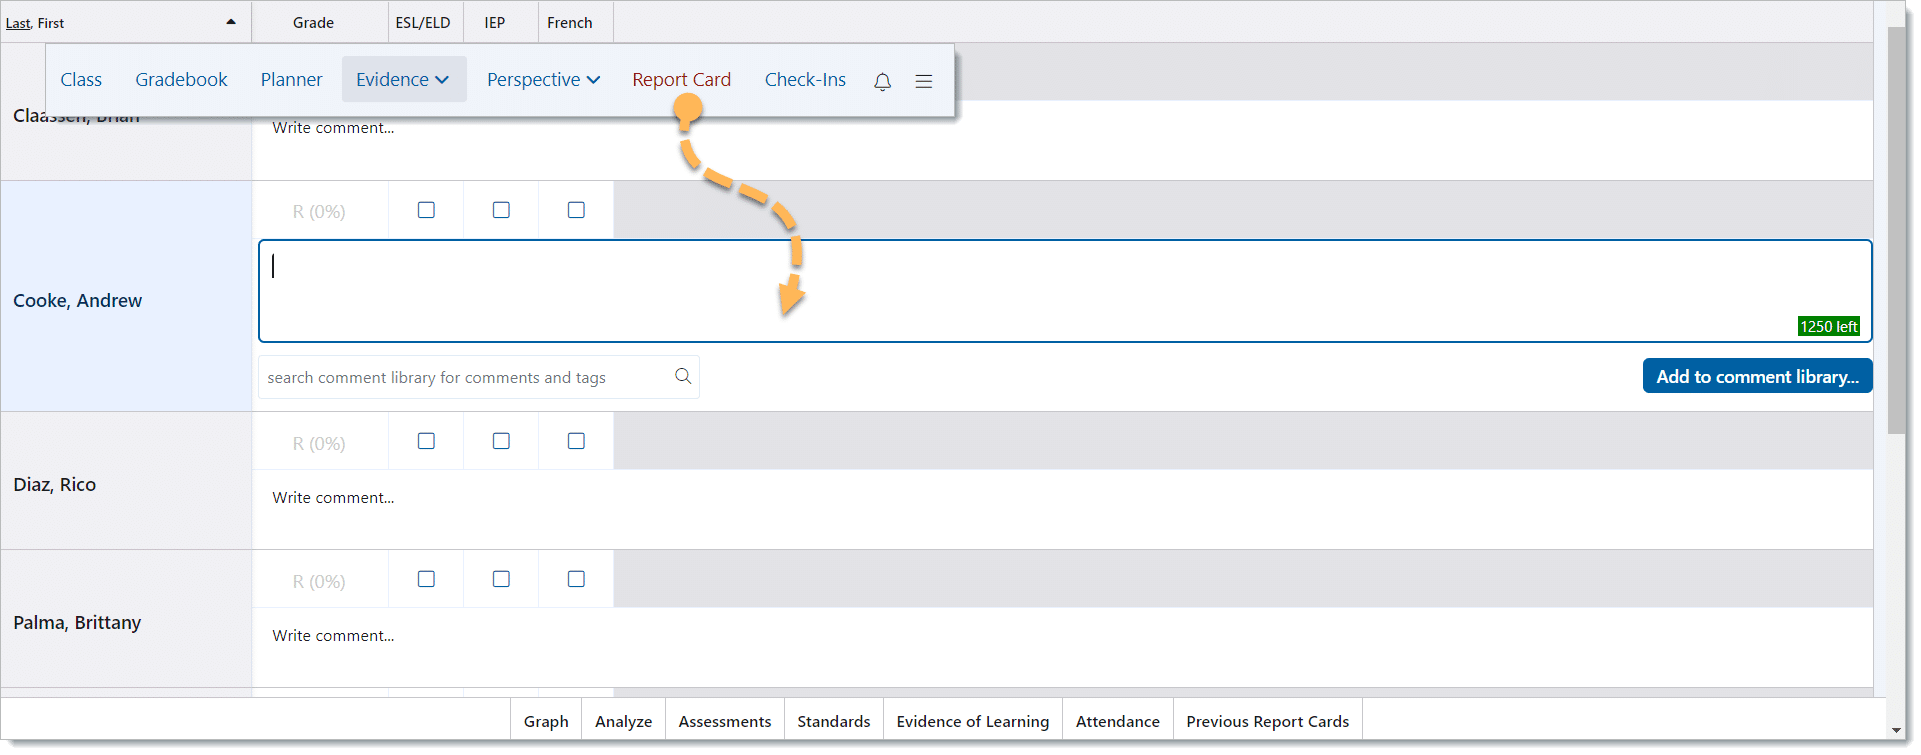
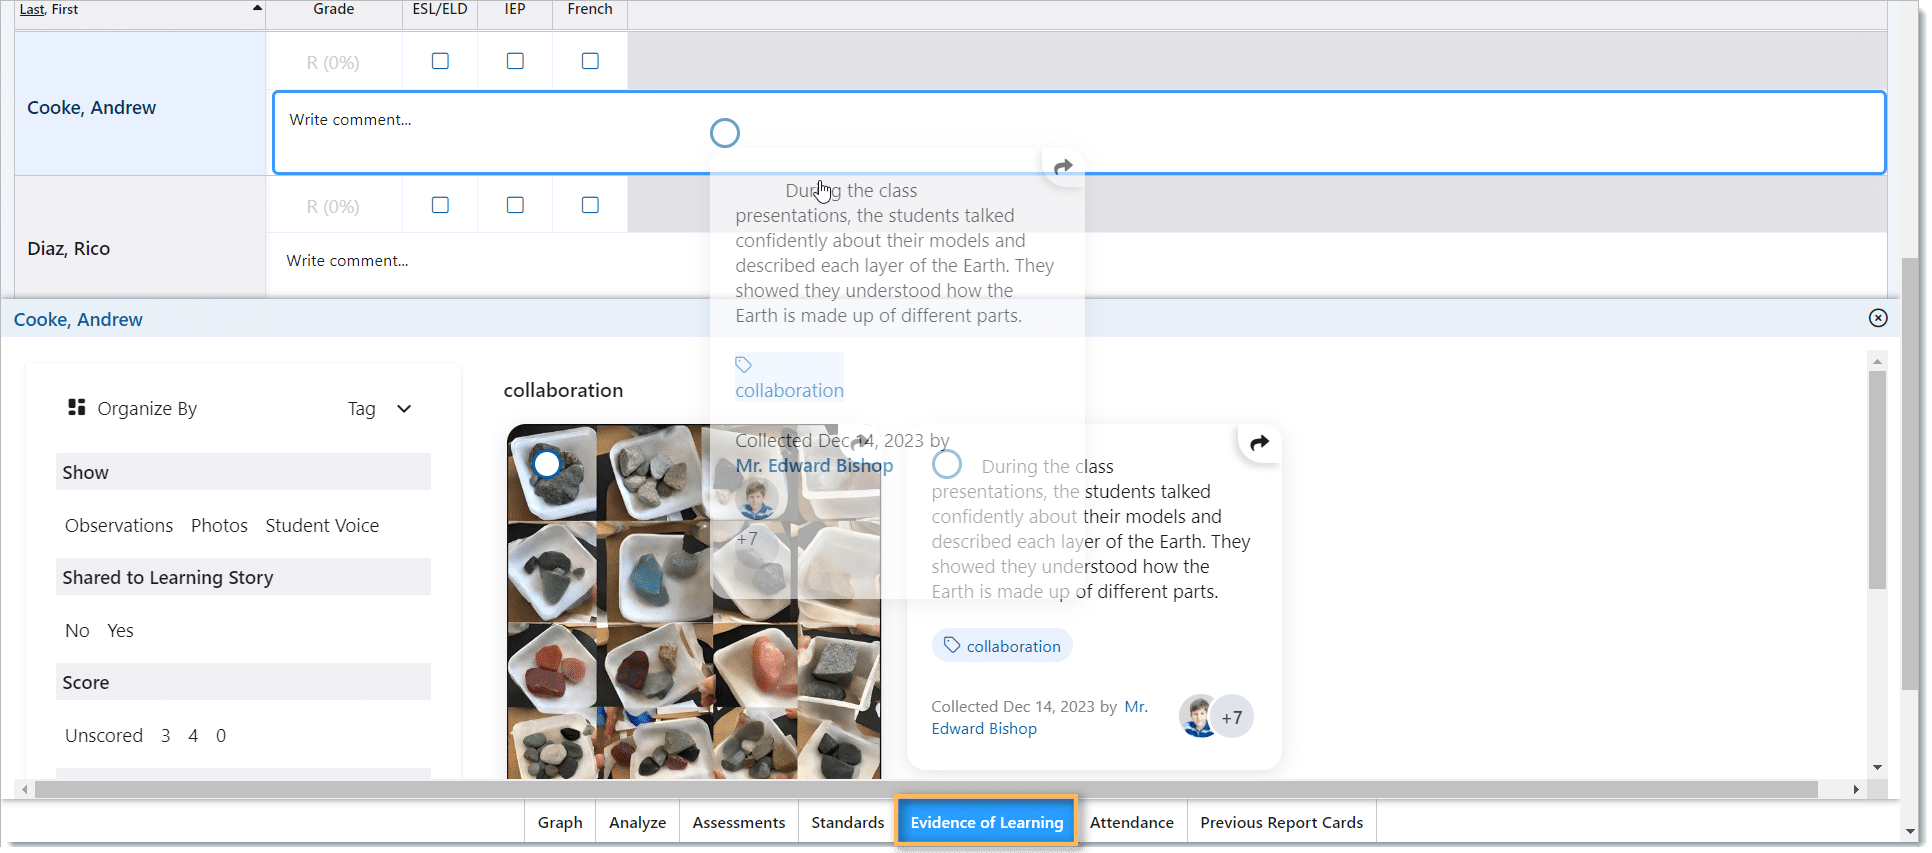
Click the name of a student from the list. This brings up options to view the student’s Perspective through the Graph, Analyze, Assessments, Standards, Evidence of Learning, Attendance, or Previous Report Cards.
Selecting Evidence of Learning will show the teacher all items of Evidence a specific student has. The filters enable teachers to filter and find the Evidence they are looking for. Click the Analysis Note Text or piece of Evidence that will be added to the report card and drag it into the comment box of the selected student.
Teachers can add additional Analysis Notes or other pieces of Evidence by dragging and dropping them from the student’s perspective to the comment box in the report cards.
Teachers can still manually type comments in once Analysis Notes and Evidence have been added.